
SharePoint, Disaster Recovery (DR), COOP, High Availability (HA) and the definitive implementation guide - part 1: SP 2013, SQL 2012:
Part 1 of this guide is to show how to create a proper COOP farm for SharePoint 2013. Remember from Part 0 that these scenarios already assume that you know how to setup an HA environment with redundant Web Front Ends, SQL Servers, etc. We'll also be making some additional assumptions to keep the post light and to the point.
Our final configuration will be:
1 Web Application with the URL http://vm-sp2013
1 PROD Server: VM-SP2013_PROD and will host the _PROD SQL Server, the WFE Role, CA and the Application Server Roles
1 COOP Server: VM-SP2013_COOP and will host the _COOP SQL Server, the WFE Role, CA and the Application Server Roles
Farm will have Search, User Profile Service, Managed Metadata Service and Content available for use. Other Service Applications will not be covered in this guide.
These steps assume your current state is:
VM-SP2013_PROD and VM-SP2013_COOP are nodes in the cluster VM-SP2013. (I choose VM-SP2013 because it'll negate the DNS redirect, but you can do what you like.)
Both _PROD and _COOP servers have SQL 2012 installed and configured
Both _PROD and _COOP servers have SharePoint 2013 installed (including PreReqs)
Both _PROD and _COOP have had PSConfig run to create your farm. The ONLY service application you deployed in the wizard is the State Service.
Both _PROD and _COOP only have the Central Administration Web Application and the following service applications: Application Discovery and Load Balancer Service Application, Security Token Service Application, State Service
There are no availability groups configured
If you need a quick refresher on setting up clusters in HyperV, check outhttp://blogs.technet.com/b/mghazai/archive/2009/12/12/hyper-v-guest-clustering-step-by-step-guide.aspx and if you need a hand with AlwaysOn, check out http://blogs.technet.com/b/wbaer/archive/2011/10/12/implementing-sql-server-code-name-denali-ctp3-alwayson-availability-groups-with-sharepoint-server-2010.aspx
To review, your Web Application and Service Applications screens should look like:
PROD:


COOP:


All of these Steps are done on _PROD ONLY
If everything is configured correctly, you should have a rather plain vanilla SharePoint farm. Central Admin Screenshots should look like:


And if you browse to http://VM-SP2013, you should see:

if your configuration does not match my screenshots, then you should: A) account for the differences and move to the next step or B) fix your environment to match mine.
Now that PROD is configured, it's time to configure _COOP. Note that there are no availability groups yet; that will be later.
All of these Steps are done on _COOP ONLY
Now we need create some data in UPS, MMS and the content database so when we check COOP, we know AlwaysOn worked. To the end, I:


Once you have the seed data complete, go back to _PROD SQL Management Studio:
From _PROD SQL Management Studio
From _PROD Central Administration

From _COOP Central Administration


So far, we have configured the _PROD and _COOP farms. We have also restored the MMS and UPS Service Applications from _PROD to _COOP, which brings across the encryption keys for FIM. The next series of steps will AlwaysOn.
From _COOP Central Administration
From _COOP SQL Management Studio

That's not a typo; by stopping the services, we can delete and restore the databases. AlwaysOn requires a Standby restore and frankly: it's simpler to let the wizard do it for us. Let's go configure AlwaysOn.
From _PROD SQL Management Studio


From _COOP SQL Management Studio, verify the new databases are synchronizing

From _COOP SharePoint Management Shell
From _COOP Central Administration
And complete! Congratulations - you have successfully setup SharePoint 2013 in a true DR scenario with a hot standby COOP farm. Our RTO is measure in seconds if you're using clustering, or your DNS TTL if you opted that route. Our RPO is less than a minute because we're running asynchronous updates. Our COOP farm is always online and can be browsed in its read-only state at any time.
Let's simulate a failover from _PROD to _COOP
From _PROD SQL Management Studio
 Profile information is successful!


And there you have it. A full DR plan, with a COOP farm, the configuration and failover steps and no mention of UPRE. From here, you could change your database to automatic failover to better utilize cluster services, or you could expand this article and build your HA plan on top. Setting up additional web front ends, service apps, etc. will allow you to better utilize your environment.
You'll notice that we didn't AlwaysOn the search databases; the COOP environment and the PROD environment have separate instances. In the real world, you would configure COOP search to crawl the AAM http://vm-sp2010_COOP on a regular basis to have up to date search results. Other service applications not covered here would also have isolated instances. For example: Access Services, PerformancePoint, etc. would have separate COOP instances and would not be set to AlwaysOn.
Look out for Part 2: SharePoint 2010 with SQL 2012 AlwaysOn!

Our final configuration will be:
1 Web Application with the URL http://vm-sp2013
1 PROD Server: VM-SP2013_PROD and will host the _PROD SQL Server, the WFE Role, CA and the Application Server Roles
1 COOP Server: VM-SP2013_COOP and will host the _COOP SQL Server, the WFE Role, CA and the Application Server Roles
Farm will have Search, User Profile Service, Managed Metadata Service and Content available for use. Other Service Applications will not be covered in this guide.
These steps assume your current state is:
VM-SP2013_PROD and VM-SP2013_COOP are nodes in the cluster VM-SP2013. (I choose VM-SP2013 because it'll negate the DNS redirect, but you can do what you like.)
Both _PROD and _COOP servers have SQL 2012 installed and configured
Both _PROD and _COOP servers have SharePoint 2013 installed (including PreReqs)
Both _PROD and _COOP have had PSConfig run to create your farm. The ONLY service application you deployed in the wizard is the State Service.
Both _PROD and _COOP only have the Central Administration Web Application and the following service applications: Application Discovery and Load Balancer Service Application, Security Token Service Application, State Service
There are no availability groups configured
If you need a quick refresher on setting up clusters in HyperV, check outhttp://blogs.technet.com/b/mghazai/archive/2009/12/12/hyper-v-guest-clustering-step-by-step-guide.aspx and if you need a hand with AlwaysOn, check out http://blogs.technet.com/b/wbaer/archive/2011/10/12/implementing-sql-server-code-name-denali-ctp3-alwayson-availability-groups-with-sharepoint-server-2010.aspx
To review, your Web Application and Service Applications screens should look like:
PROD:


COOP:


All of these Steps are done on _PROD ONLY
- Create a New Web Application. For the scenario, our URL is http://VM-SP2013 and the database is WSS_Content
- Add an AAM to the Web Application in the Intranet Zone as http://VM-SP2013_PROD (match the machine name)
- Create an Explicit Inclusion and an Wildcard Inclusion managed path for your My Sites; I used mysite and mysite/personal respectively
- Create a Root Site Collection (whatever template you want; I chose team because it was the first one)
- Create a My Site Host collection on http://VM-SP2013/MySite
- Provision a New Search Service. The database names are irrelevant
- Setup MMS; note and save the database name you are using. I used MMS DB
- Setup UPS
- Note the database names you are using. I used the defaults: Profile DB, Social DB, Sync DB
- My Site Host URL, use http://VM-SP2013/MySite
- My Site Managed Path: mysite/personal
- Go to Central Administration --> System Settings --> Services on Server and click "Start" for
- Managed Metadata Web Service
- User Profile Service
- User Profile Synchronization Service
- Reboot _PROD to give User Profile Sync Service / FIM the kick it needs to actually start up. If User Profile Sync doesn't start, then stop and troubleshoot.
- If your cluster name isn't VM-SP2013, then create a new DNS CNAME to point VM-SP2013 to VM-SP2013_PROD
If everything is configured correctly, you should have a rather plain vanilla SharePoint farm. Central Admin Screenshots should look like:


And if you browse to http://VM-SP2013, you should see:

if your configuration does not match my screenshots, then you should: A) account for the differences and move to the next step or B) fix your environment to match mine.
Now that PROD is configured, it's time to configure _COOP. Note that there are no availability groups yet; that will be later.
All of these Steps are done on _COOP ONLY
- Create a New Web Application with a different database name than _PROD. For the scenario, our URL is http://VM-SP2013 and the database is WSS_Content_DeleteMe
- Add an AAM to the Web Application in the Intranet Zone as http://VM-SP2013_COOP (match the machine name). It is important that the default zone matches on both _PROD and _COOP.
- Provision a New Search Service. The database names are irrelevant
Now we need create some data in UPS, MMS and the content database so when we check COOP, we know AlwaysOn worked. To the end, I:
- Configured a Synchronization Connection in UPS and imported the fake profiles from my lab (a little over 200)

2. Created a My Site and updated my Profile with the words "Test from PROD"

3. Tagged the homepage and wrote on the noteboard with "Testing noteboard from PROD"

Home Page has been tagged

Updated the Note Board for the home page
Once you have the seed data complete, go back to _PROD SQL Management Studio:
From _PROD SQL Management Studio
- Connect to _PROD SQL Instance
- Right click on the Profile DB and select Properties
- On the Database Properties screen, select Options
- Change the recovery model to Full
- Click OK to close the screen
- Repeat steps 1-5 for the Social and Sync databases
From _PROD Central Administration
- Select Backup and Restore, then select Perform a backup
- Choose the MMS Service Application. Click OK
- On Step 2 of 2, choose a local path and choose the Full backup. Click OK
- Wait for Backup to Finish
- Repeat Steps 1-4 for MMS Service Application Proxy, User Profile Service Application and User Profile Service Application Proxy
- When all said and done, your backup directory should have 4 folders and 1 XML file

7.Copy the entire directory to _COOP
From _COOP Central Administration
- Select Backup and Restore, then select Restore from backup
- Select the directory you copied the files from in Step 7 and select refresh. You should see the MMS Service App, MMS Proxy, UPS Service App and UPS Proxy

3. Restore the MMS Service Application, choosing "New Configuration" and changing the Database Server Name to "VM-SP2013_COOP"

4. Select Start Restore and wait for it to complete. Troubleshoot any errors and retry restore until it succeeds.
5. Repeat steps 1 - 4 for MMS Proxy, UPS Service App, UPS Proxy in that order. Troubleshoot any restore errors before moving to the next restore Make sure you choose "New Configuration" and change the database server name to _COOP, but do not change the database names. Small note: when I restored the UPS proxy, it failed with error but still provisioned. I believe this is a bug in 2013 RP. If you get a similar failure, just continue and make sure the proxy was created.
6. Once complete, verify your Service Application on _COOP matches the screenshot

7. Lastly, go to Central Administration --> System Settings --> Services on server and start: Managed Metadata Web Service, User Profile Service, User Profile Synchronization Service. After you click Start for User Profile Synchronization Server, reboot _COOP to get it to start.
8. Once _COOP comes back online, verify all three services are set to Started. If one is not started, stop here and troubleshoot.

8. Add the UPS and MMS service to the default application proxy group
So far, we have configured the _PROD and _COOP farms. We have also restored the MMS and UPS Service Applications from _PROD to _COOP, which brings across the encryption keys for FIM. The next series of steps will AlwaysOn.
From _COOP Central Administration
- Select System Settings, then select Services on Server
- Stop the MMS, User Profile Service and User Profile Sync
From _COOP SQL Management Studio
- Right click on MMS DB and select Delete. Mark Close Existing Connections
- Repeat step 1 for Profile DB, Social DB and Sync DB
- Your SQL Environment should now look like this:

That's not a typo; by stopping the services, we can delete and restore the databases. AlwaysOn requires a Standby restore and frankly: it's simpler to let the wizard do it for us. Let's go configure AlwaysOn.
From _PROD SQL Management Studio
- Expand AlwaysOn High Availability. Right click on Availablilty Groups and select New Availability Group Wizard

2. Provide a new name for the Availability Group and click Next

3. Select the MMS DB, Profile DB, Social DB, Sync DB, WSS_Content and click Next

4. On the Specify Replicas screen, select Add Replica and connect to _COOP. Change Secondary for both servers toYes. Leave the rest of the selection as is

5. On the Select Initial Data Synchronization insure Full is selected and provide a UNC path that both _PROD and _COOP can access. Select Next

6. Verify the Validation is successful and troubleshoot any errors. Click Next and then Finish to enable the databases in AlwaysOn. Depending on the sizes of your database, this should take some considerable time.

Ignore the error about the quorum; that's just SQL letting me know that I've only got a Disk vote.
From _COOP SQL Management Studio, verify the new databases are synchronizing

From _COOP SharePoint Management Shell
Dismount the WSS_Content_DeleteMe database by executing: Dismount-SPContentDatabase WSS_Content_DeleteMe
Mount the AlwaysOn WSS_Content database from _PROD by executing: Mount-SPContentDatabase WSS_Content -WebApplication http://VM-SP2013
From _COOP Central Administration
- Select System Settings, then select Services on Server
- Start the Managed Metadata Web Service and the User Profile Service
- Do not start User Profile Synchronization Server
- If you try to start it, it will be hung as Starting and eventually fail.
And complete! Congratulations - you have successfully setup SharePoint 2013 in a true DR scenario with a hot standby COOP farm. Our RTO is measure in seconds if you're using clustering, or your DNS TTL if you opted that route. Our RPO is less than a minute because we're running asynchronous updates. Our COOP farm is always online and can be browsed in its read-only state at any time.
Let's simulate a failover from _PROD to _COOP
From _PROD SQL Management Studio
- Expand AlwaysOn High Availability. Expand Availability Groups
- Right click SharePoint DBs and select Failover...
- Continue through the resultant wizard until the failover has finished.
- Now the _COOP server DBs are (Synchronized) and _PROD server DBs are (Not Synchronizing)
- If you have used the Cluster Name VM-SP2013, then fail the cluster to _COOP. If elected for DNS, update your VM-SP2013 CNAME to VM-SP2013_COOP
- Browse to http://VM-SP2013 and verify Seed data
 Profile information is successful!
Social Tagging and WSS_Content are successful!
From _COOP Central Administration
1.Start User Profile Synchronization service (may need an IISReset)
2. Verify Seed Data

UPS failover is successful!
Eventually you'll want to fail back to PROD. To do that:
From _PROD SQL Management Studio
- Expand AlwaysOn High Availability. Expand Availability Groups. Expand SharePoint DB (Secondary). Expand Availability Databases.

- Right click on MMS DB and select Resume Data Movement. and click OK on the popup window
- Repeat steps 1 and 2 for Profile DB, Social DB, Sync DB and WSS_Content
- Give a moment for all the databases to go to Synchronizing status in SQL Server Management Studio
- Once complete, redo the "simulated failover" steps, but perform COOP steps on PROD and PROD steps on COOP

You'll notice that we didn't AlwaysOn the search databases; the COOP environment and the PROD environment have separate instances. In the real world, you would configure COOP search to crawl the AAM http://vm-sp2010_COOP on a regular basis to have up to date search results. Other service applications not covered here would also have isolated instances. For example: Access Services, PerformancePoint, etc. would have separate COOP instances and would not be set to AlwaysOn.
Look out for Part 2: SharePoint 2010 with SQL 2012 AlwaysOn!
http://blinditandnetworkadmin.blogspot.in/2012/08/sharepoint-disaster-recovery-dr-coop.html
Mastering Business Connectivity Services in SharePoint 2010
Abstract: This article demonstrates how to build your own Business Connectivity Services (BCS) SharePoint 2010 components, "connectors"
They
call me the “Connector guy”- affectionately of course- where I work,
because I am like a Business Connectivity Services (BCS) machine when it
comes to crunching out connectors to legacy systems. So I thought I
would take the time to help others get over the learning curve of
leaning to use BCS.
After reading this
article, I hope you will agree that creating External list to data is
just a walk in the park-like most tasks developers do, when they get the
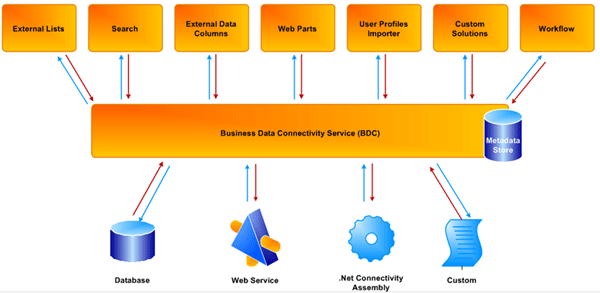
hang of it. The following chart is a good reference and depicts nicely
that many tasks can be performed using the BCS architecture. In fact,
almost any tasks can be performed using simple lists exposed by Business
Connectivity Services (BCS) Services. In fact, “Everything is a list”,
is one of my popular sayings.
BCS Architecture
So if everything is a list, then let’s get started building some lists!
Note:
I am going to assume that you have a development environment set up-
probably on a virtual machine, and that you have an instance of
SharePoint 2010 on that machine. Microsoft has simplified the
development process greatly, but requires a lot of software installed as
a prerequisite to getting started with SharePoint development. Ah, the
pains of being a Microsoft developer!
Anyway, fire up VS 2010
and select File, New, and Project from the file menu. Again, Microsoft
has done a nice job of creating templates for a lot of the SharePoint
objects required to be successful in this environment- and yes, there is
a BCS Template:
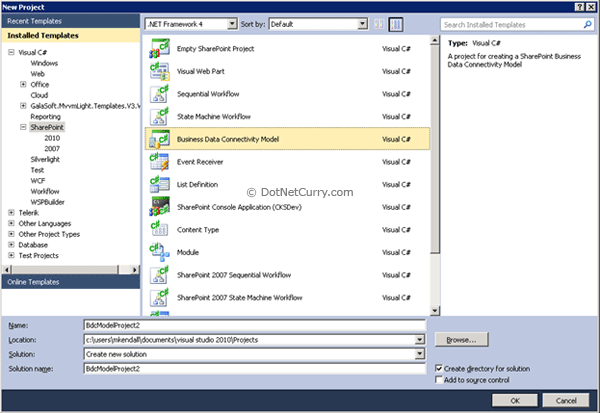
After selecting
Business Data Connectivity Model from the SharePoint 2010 list and
naming the project whatever you want, you will and up with the good,
start towards creating a connector that will be exposed as a list on
your SharePoint site:
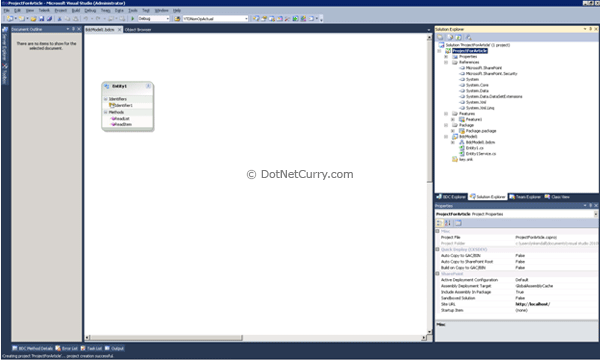
I know what you’re
thinking. This looks like any other template, with very little
functionality and a lot of work to get it in shape to work in a
real-world environment. Am I right? Well, your thinking is correct, but
that is the reason I am writing this article. I thought the same thing,
and as it turns out there a lot of little nuances in creating a “good
connector”, and I will show the best way that I have found- and you can modify my model to fit your style.
Note: I
think you will find using BCS, that taking small steps is going to
prove to be a better strategy then plowing through all the steps and
getting to the end, only to have a connector that is throwing errors and
not being able to figure out how to fix them-(The correlation id
problem- more on that later.)
So here is the first
small step: Let’s rebuild the solution and deploy it to SharePoint - we
will find out many things from this simple task:
1. Will the project compile without error?
2. Will it deploy to SharePoint?
3. Can we set the appropriate security settings on our BCS Component?
4. Can we create an External list in SharePoint using this BCS Component?
If all the steps go
well and run without error, then we will be able to begin creating
custom BCS components. The steps are as follows
Step 1 - Rebuild the solution
Step 2 - Deploy the solution
Step 3 - Set the permissions
Step 4 - Create External List in SharePoint 2010
Step 5 - Preview the list
Step 2 - Deploy the solution
Step 3 - Set the permissions
Step 4 - Create External List in SharePoint 2010
Step 5 - Preview the list
Let us explore these steps in details:
Step 1: Rebuild the Solution
Select build rebuild solution from the File menu
Step 2: Deploy the Solution
Select build deploy from the File menu
Step 3: Set the permissions
Click on application management > manage service applications > Business Data Connectivity Service and find Entity1 from the list- this is the entity that we just deployed

Click on Entity1 and you should see this screen:
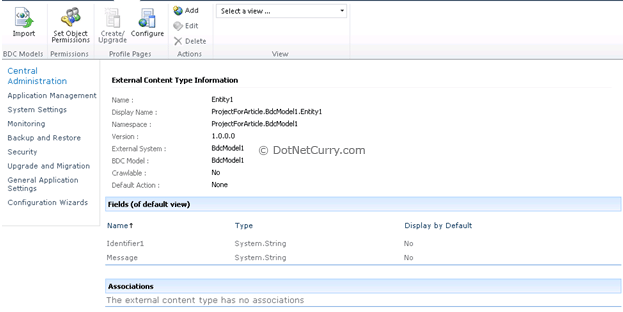
Click on set object permissions and give the appropriate rights to those who will be viewing the list
Step 4: Create the external list
Go to the main SharePoint site (http://yoursite) and click on site actions > view all site content > create, external list > create
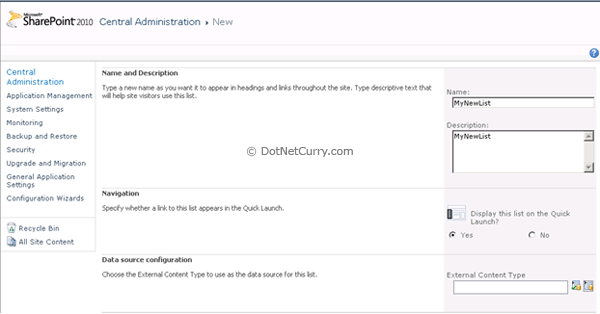
Click the second icon from the External Content Type and select Entity1 from the pop-up:
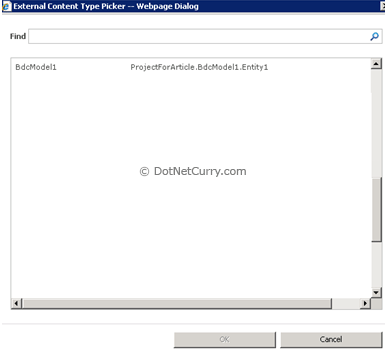
Select create and your list will be created
Step 5: Preview the list

Summary
Congratulation, you’re
on your way to becoming the “connector guy/girl” at your company. Of
course this connector doesn’t do much, but we have fulfilled all the
steps required to our ultimate goal of making “everything is a list”. If
you have gotten this far, and you are looking at the list we created
above, then all the obstacles have been cleared to creating your own,
more powerful connectors!
Part 2 Creating Custom BCS Components
Part 1 of this series
put us in a position to start building our own BCS SharePoint 2010
components, “connectors” and Part 2 will show you how to create powerful
custom connectors that are connected to a database-so look out for
Article 2 in this series.
Update: Part 2 of this article can be viewed here Mastering Business Connectivity Services in SharePoint 2010 (Part 2)
No comments:
Post a Comment