Sunday, 30 June 2013

How To- Export Gridview to PDF in ASP.Net with Image

How To- Export Gridview to PDF in ASP.Net with Image


Exporting Gridview to PDF


For exporting the data, I am using the iTextSharp (third party dll) in this post. Download the iTextSharp .
I have following Table which contains the Image Information like Image Name and Image Path.
Export Gridview to PDF in ASP.Net with Image
For exporting images into PDF we need to convert the ImagePath shown in table into its absolute URl. For example, In the above image-

Images/Chrysanthemum.jpg
Now we have to change it in to-
http://localhost/Images/Chrysanthemum.jpg
So for this conversion, You can use the following function-
public string GetImageUrl(string imagepath)
{
  string[] splits = Request.Url.AbsoluteUri.Split('/');
  if (splits.Length >= 2)
  {
    string url = splits[0] + "//";
    for (int i = 2; i < splits.Length - 1; i++)
    {
       url += splits[i];
       url += "/";
    }
      return url + imagepath;
  }
  return imagepath;
}
Now we have to call this function for creating absolute URL of images. Here,I am calling this function as shown below- 
<asp:GridView ID="grdSample" runat="server" AutoGenerateColumns="False" 
            DataSourceID="SqlDataSource1" Width="400px">
            <Columns>
        <asp:BoundField DataField="ID" HeaderText="ID" SortExpression="ID" />
           <asp:BoundField DataField="ImageName" HeaderText="ImageName" 
                    SortExpression="ImageName" />
                <asp:TemplateField ItemStyle-Height="100" ItemStyle-Width="100" HeaderText="Image"> 
                    <ItemTemplate>
                        <asp:Image ID="Image1" runat="server" ImageUrl='<%# Eval("ImagePath", GetImageUrl("{0}")) %>' Height="100" Width="100" />
                    </ItemTemplate>
                </asp:TemplateField>
            </Columns>
        </asp:GridView>
        <asp:SqlDataSource ID="SqlDataSource1" runat="server" ConnectionString="<%$ ConnectionStrings:TestTableConnectionString %>"
            SelectCommand="SELECT * FROM [ImageInfo]"></asp:SqlDataSource>
        <br />
        <asp:Button ID="btnExport" runat="server" Text="Expot to PDF" OnClick="btnExport_Click" />
In the above markup you can see that I am passing the "ImagePath" getting from database to "GetImageUrl" method for getting absolute image URL. Now write the following code on Click event of button. 
protected void btnExport_Click(object sender, EventArgs e)
        {
            Response.ContentType = "application/pdf";
            Response.AddHeader("content-disposition", "attachment;filename=Sample.pdf");
            Response.Cache.SetCacheability(HttpCacheability.NoCache);
            StringWriter sw = new StringWriter();
            HtmlTextWriter hw = new HtmlTextWriter(sw);
            //Set AllowPaginf false to export the full data
            grdSample.AllowPaging = false;
            grdSample.DataBind();
            //Start the rendering of control here
            grdSample.RenderBeginTag(hw);
            grdSample.HeaderRow.RenderControl(hw);
            foreach (GridViewRow row in grdSample.Rows)
            {
                row.RenderControl(hw);
            }
            grdSample.FooterRow.RenderControl(hw);
            grdSample.RenderEndTag(hw);
            //Apply some style settimgs
            grdSample.Caption = "Your caption";
            grdSample.Style.Add("width", "400px");
            grdSample.HeaderRow.Style.Add("font-size", "12px");
            grdSample.HeaderRow.Style.Add("font-weight", "bold");
            grdSample.Style.Add("border", "1px solid black");
            grdSample.Style.Add("text-decoration", "none");
            grdSample.Style.Add("font-family", "Arial, Helvetica, sans-serif;");
            grdSample.Style.Add("font-size", "8px");
            StringReader sr = new StringReader(sw.ToString());
            //creating new pdf document
            Document pdfDoc = new Document(PageSize.A4, 7f, 7f, 7f, 0f);
            HTMLWorker htmlparser = new HTMLWorker(pdfDoc);
            PdfWriter.GetInstance(pdfDoc, Response.OutputStream);
            pdfDoc.Open();
            htmlparser.Parse(sr);
            pdfDoc.Close();
            Response.Write(pdfDoc);
            Response.End();
            Response.Clear();
        }
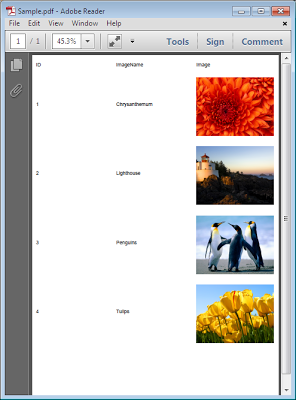
Output Screens
Export Gridview to PDF in ASP.Net with Image
Fig-Gridview on WebPage
Export Gridview to PDF in ASP.Net with Image

show Reports of User Registered on Particular Date

show Reports of User Registered on Particular Date

.aspx Page Code:

<%@ Page Language="C#" AutoEventWireup="true" CodeFile="Report.aspx.cs" Inherits="Report" %>

<!DOCTYPE html PUBLIC "-//W3C//DTD XHTML 1.0 Transitional//EN" "http://www.w3.org/TR/xhtml1/DTD/xhtml1-transitional.dtd">

<html xmlns="http://www.w3.org/1999/xhtml">
<head runat="server">
    <title></title>
</head>
<body>
    <form id="form1" runat="server">
   <div>
   <table class="style1" align="center">
                <tr>
                    <td bgcolor="#99CCFF" colspan="2" style="text-align: center">
                        S<b>how Reports on User Registered </b></td>
                </tr>
                <tr>
                    <td>
                        <asp:Label ID="lblstartdate" runat="server" Text="Registration Date"></asp:Label>
                    </td>
                    <td>
                        <asp:TextBox ID="txtstartingdate" runat="server"></asp:TextBox>
                        <br />
                        <asp:Calendar ID="Calendar1" runat="server"
                            onselectionchanged="Calendar1_SelectionChanged"></asp:Calendar>
                    </td>
                </tr>
                <%--<tr>
                    <td>
                        <asp:Label ID="lblendingdate" runat="server" Text="Ending Date"></asp:Label>
                    </td>
                    <td>
                        <asp:TextBox ID="txtendingdate" runat="server"></asp:TextBox>
                    </td>
                </tr>--%>
                <tr>
                    <td>
                        &nbsp;</td>
                    <td>
                        <asp:Button ID="btnfilter" runat="server" Text="Show  Registered Users" Width="166px"
                            onclick="btnfilter_Click" />
                    </td>
                </tr>
            </table>
</div>

    <asp:GridView ID="GVMec" runat="server">
    </asp:GridView>

    </form>
</body>

</html>

===============================================================

.CS CODE:

using System;
using System.Collections.Generic;
using System.Linq;
using System.Web;
using System.Web.UI;
using System.Web.UI.WebControls;
using System.Data.SqlClient;
using System.Drawing;
using System.Configuration;
using System.Data;

public partial class Report : System.Web.UI.Page
{
    string Str = ConfigurationManager.ConnectionStrings["ConnectionString"].ConnectionString;
    protected void Page_Load(object sender, EventArgs e)
    {

    }

    protected void btnfilter_Click(object sender, EventArgs e)
    {
       
          SqlConnection conn= new SqlConnection(Str);
         
                conn.Open();
                SqlCommand cmd = new SqlCommand();
                // cmd.Parameters.Add(new SqlParameter("@Date1", SqlDbType.DateTime)).Value = txtstartingdate ;
                SqlDataAdapter sda = new SqlDataAdapter("Select * From Tbl_User_Registration Where U_Rdate= '" + txtstartingdate.Text + "' ", conn);
                SqlCommandBuilder scb = new SqlCommandBuilder(sda);
                //Create a DataTable to hold the query results.
                DataTable dTable = new DataTable();
                //Fill the DataTable.
                sda.Fill(dTable);
                if (dTable.Rows.Count > 0)
                {
                    GVMec.DataSource = dTable;
                    GVMec.DataBind();
                }
                else
                {
                    Response.Write("<script>alert('No Recodrd Found')</script>");
                }


               }
    protected void Calendar1_SelectionChanged(object sender, EventArgs e)
    {
        txtstartingdate.Text = Calendar1.SelectedDate.ToString("dd/MM/yyyy");
     
    }

}


Saturday, 29 June 2013

Actvie Deactive Example Using Checkbox in ASP.NET GridView Control

Using Checkbox in ASP.NET GridView Control


This tutorial will show you how to use CheckBox inside GridView and how to handle its events to update database records based on its Checked state.
ASP.NET GridView Control provides developers ability to use any type of ASP.NET control in its columns using TemplateField. Developers are free to use Buttons, DropDownList, RadioButtons or any other control according to their application requirement. One of the most common control developers uses in the GridView is CheckBox control and if you are creating Administration Panel of any ASP.NET Application you may be required to handle checkbox event to update any back end database table. One Typical example is to Enable/Disable status of any record in the database table using the CheckBox in the GridView. In the following tutorial I will show you how you can use CheckBox in the GridView which not only display the current status of the record but also update the record status in the database.


CheckBox in GridView


To start this tutorial, I am assuming that you have table in your database with one Bit type column such as Approved in the following figure. 

gridview_checkbox_db.gif

Categories Table in SQL Server 2005

I will update the status of this column to True or False according to the state of the checkbox in the GridView. The Page Load event binds your Database Categories Table to your GridView Control. 
 
protected void Page_Load(object sender, EventArgs e)
{
  if (!Page.IsPostBack)
  {
    LoadData();
  }
}

private void LoadData()
{
  string constr = @"Server=.\SQLEXPRESS;Database=TestDB;uid=waqas;pwd=sql;";
  string query = @"SELECT CategoryID, CategoryName, Approved FROM Categories";

  SqlDataAdapter da = new SqlDataAdapter(query, constr);
  DataTable table = new DataTable();
  da.Fill(table);

  GridView1.DataSource = table;
  GridView1.DataBind();
}
Please keep in mind that I put connection string directly in the code just for the demonstration. You should store your database connection string in web.config file. You can also call stored procedure in the above code if you don’t want to write SQL Query directly in your code or you can also call your Data Access Layer component to retrieve Categories Table from database. The following ASP.NET source will show you how you can use TemplateField in the GridView to display CheckBox with the current status of the Category in the database.
<asp:GridView ID="GridView1" runat="server" AutoGenerateColumns="False"
    BackColor="White" BorderColor="#336699" BorderStyle="Solid" BorderWidth="1px"  
    CellPadding="0" CellSpacing="0" DataKeyNames="CategoryID" Font-Size="10"
    Font-Names="Arial" GridLines="Vertical" Width="40%">
           
            <Columns>           
                <asp:TemplateField>
                    <ItemTemplate>
                        <asp:CheckBox ID="chkStatus" runat="server"
                            AutoPostBack="true" OnCheckedChanged="chkStatus_OnCheckedChanged"
                            Checked='<%# Convert.ToBoolean(Eval("Approved")) %>'
                            Text='<%# Eval("Approved").ToString().Equals("True") ? " Approved " : " Not Approved " %>' />
                    </ItemTemplate>                   
                </asp:TemplateField>
               
                <asp:BoundField DataField="CategoryID" HeaderText="CategoryID" />                   
                <asp:BoundField DataField="CategoryName" HeaderText="CategoryName"  />
            </Columns>
           
    <HeaderStyle BackColor="#336699" ForeColor="White" Height="20" />
          
</asp:GridView>

In the above code see how I am setting Checked State of the CheckBox from the Approved Column value in the database. I am also setting the Text Property of the CheckBox Approved or Not Approved according to the state of Approved Column in database. To provide user option to update the status of any Category from the CheckBox I am also setting AutoPostBack Property to true and adding Event HandlerchkStatus_OnCheckedChanged to handle OnCheckedChanged event. Every time user will check or uncheck the CheckBox this event will update the status of Approved Column in the Database. 
 
public void chkStatus_OnCheckedChanged(object sender, EventArgs e)
{
    CheckBox chkStatus = (CheckBox)sender;
    GridViewRow row = (GridViewRow)chkStatus.NamingContainer;

   
    string cid = row.Cells[1].Text;
    bool status = chkStatus.Checked;

   
    string constr = @"Server=.\SQLEXPRESS;Database=TestDB;uid=waqas;pwd=sql;";
    string query = "UPDATE Categories SET Approved = @Approved WHERE CategoryID = @CategoryID";
       
    SqlConnection con = new SqlConnection(constr);
    SqlCommand com = new SqlCommand(query, con);

   
    com.Parameters.Add("@Approved", SqlDbType.Bit).Value = status;
    com.Parameters.Add("@CategoryID", SqlDbType.Int).Value = cid;

   
    con.Open();
    com.ExecuteNonQuery();
    con.Close();
   
    LoadData();
}

In the above code, first four lines are doing the main job. I am getting the reference of CheckBox by type casting the sender parameter of the Event Handler. To get the CategoryID I am getting reference of the entire GridViewRow object. The remaining code is straight forward ADO.NET code to execute the Update Query in Database using SqlConnection and SqlCommand object.

To insert Records :

INSERT Categories VALUES('Sms',0);

Thursday, 27 June 2013

Insert smiley in asp.net

Insert smiley images automatically in asp.net when user enter emotion text


Now let me show how you can easily do the same in asp.net with simple javascript code.
  • First of all download some smiley images and paste them in your website's root folder
  • Put a div element inside your aspx page with contentEditable property set to true and onkeyup="replacewithimg(this);"


  • In head section of your aspx page add the following javascript


Explaination:


  • txt & img are two Arrays which holds the emotion text and emotion image element source code respectively side by side


  • replacewithimg is a function which accept div as a parameter in which the client is typing. This function is called when user press and release a key. In this function I created a for loop which checks whether any emotion text is there in div or not, if it is there then the javascript's replace() function will replace it with corresponding img tag which is stored in img array and after replacing the text set div's innerHTML to var innHTML which contains the updated innerHTML.


[Note: regular.gif, tongue.gif and Sad.gif are the names of my smiley images, Please update them if you have different names]

Download Demo Website

Login Page and Logout Page code

Login Page and Logout Page Code using Cookies and Sessions


LOGIN Code:
using System.Data;
using System.Data.SqlClient;
public partial class _Default : System.Web.UI.Page
{
protected void Page_Load(object sender, EventArgs e)
{
Session.RemoveAll();  //it Removes all Sessions that previously stored
}
// the Below code is for the Login Code in Buttion1_Click
protected void Button1_Click(object sender, EventArgs e)
{
string connetionString = null;
SqlConnection connection;
SqlCommand command;
SqlDataAdapter adapter = new SqlDataAdapter();
DataSet ds = new DataSet();
string sql = null;
connetionString = “Data Source=OMSOFT-D371932D;Initial Catalog=MYDB;Integrated Security=True”;
sql = “select * from login where username=’” + TextBox1.Text + “‘ AND Password=’” + TextBox2.Text + “‘”;
connection = new SqlConnection(connetionString);
connection.Open();
command = new SqlCommand(sql, connection);
adapter.SelectCommand = command;
adapter.Fill(ds,”tempLogin”);
adapter.Dispose();
command.Dispose();
connection.Close();
//This Code is used for the Useraname and Password Checking
if (ds.Tables[0].Rows.Count>0)
{
Session["x"] = TextBox1.Text;
Session.Timeout = 1;
HttpCookie c = new HttpCookie(“userdetails”);
c["user name"] = TextBox1.Text;
//c["Password"] = TextBox2.Text;
c.Expires = DateTime.Now.AddMinutes(1);
Response.Cookies.Add(c);
Response.Redirect(“Home.aspx”);
}
}
}
LOGOUT Code:
using System.Collections;
public partial class Home : System.Web.UI.Page
{
protected void Page_Load(object sender, EventArgs e)
{
// This Code is used to Disable the Browser “BACK Button”
Response.ClearHeaders();
Response.AppendHeader(“Cache-Control”, “no-cache”); //HTTP 1.1
Response.AppendHeader(“Cache-Control”, “private”); // HTTP 1.1
Response.AppendHeader(“Cache-Control”, “no-store”); // HTTP 1.1
Response.AppendHeader(“Cache-Control”, “must-revalidate”); // HTTP 1.1
Response.AppendHeader(“Cache-Control”, “max-stale=0″); // HTTP 1.1
Response.AppendHeader(“Cache-Control”, “post-check=0″); // HTTP 1.1
Response.AppendHeader(“Cache-Control”, “pre-check=0″); // HTTP 1.1
Response.AppendHeader(“Pragma”, “no-cache”); // HTTP 1.1
Response.AppendHeader(“Keep-Alive”, “timeout=3, max=993″); // HTTP 1.1
Response.AppendHeader(“Expires”, “Mon, 26 Jul 1997 05:00:00 GMT”); // HTTP 1.1
//This code is used to maintain UserName in the Home page using Session and Cookies
        if (Session["x"] == null)
{
Response.Redirect(“Default.aspx”);
}
else
{
IEnumerator mc;
mc = Request.Cookies.AllKeys.GetEnumerator();
while (mc.MoveNext())
{
if (Request.Cookies[mc.Current.ToString()].HasKeys == true)
{
IEnumerator sc;
sc = Request.Cookies[mc.Current.ToString()].Value.GetEnumerator();
while (sc.MoveNext())
{
Response.Write(sc.Current.ToString() + Request.Cookies[mc.Current.ToString()][sc.Current.ToString()]);
}
}
}
}
}
//This Code is for the LOGOUT Code
protected void Button1_Click(object sender, EventArgs e)
{
Session.Clear();
Session.RemoveAll();
Session.Abandon();
Response.Redirect(“Default.aspx”, true);
}
}

Insert Datetime in Default Insert Statement in ASP.net

Insert Datetime in Default Insert Statement in ASP.net

If u have Table is Like

UId=int
Uname= varchar2(50);
Udate= Datetime;

Then for Inserting Default date use Below 2 Methods:


Use below code  for Inserting  Current date As Default Value:


 '" + DateTime.Now.ToString("yyyy-MM-dd") + "'


        SqlCommand cmd = new SqlCommand("insert into user1 (uname,pwd,date1) values('" + TextBox1.Text + "','" + TextBox2.Text + "', '" + DateTime.Now.ToString("yyyy-MM-dd") + "') ", con);


Using  cmd.Parameter.AddwithValue Use Below Code to Insert Current Date As Defult

cmd.Parameters.AddWithValue("@date1", DateTime.Now);


        //SqlCommand cmd = new SqlCommand("insert into user1 (uname,pwd,date1)values(@uname,@pwd,@date1)", con);
        //cmd.Parameters.AddWithValue("@uname", TextBox1.Text);
        //cmd.Parameters.AddWithValue("@pwd", TextBox2.Text);
        //cmd.Parameters.AddWithValue("@date1", DateTime.Now);


GridView with Insert, Edit, Update, Delete the Ado.net way C#

How to use GridView with Insert, Edit, Update, Delete the Ado.net way C#


How to use GridView with Insert, Edit, Update, Delete the Ado.net way C#

As I have written before about how to bind data with GridView Control with database.
Now, I in this article I will use Itemtemplate and Edittemplate where we will do Edit, Update and Delete the records.
Before to do it first of all create a database.

Or
Run the following script in your Sql Server 2005.
SET ANSI_NULLS ON
GO
SET QUOTED_IDENTIFIER ON
GO
IF NOT EXISTS (SELECT * FROM sys.objects WHERE object_id =OBJECT_ID(N‘[dbo].[tbuser]‘) AND type in (N‘U’))
BEGIN
CREATE TABLE [dbo].[tbuser](
[id] [int] IDENTITY(1,1) NOT NULL,
[uid] [varchar](50) NOT NULL,
[Name] [varchar](50) NULL,
[address] [varchar](50) NULL,
[salary] [int] NULL,
CONSTRAINT [PK_tbuser] PRIMARY KEY CLUSTERED
(
[uid] ASC
)WITH (PAD_INDEX  = OFF, STATISTICS_NORECOMPUTE  = OFF,IGNORE_DUP_KEY = OFF, ALLOW_ROW_LOCKS  = ON, ALLOW_PAGE_LOCKS  = ON)ON [PRIMARY]
) ON [PRIMARY]
END
Well place the GridView control on a form and set the following property.
1.AutoGenerateColumns=”False”
And set the Gridview Events name is
onpageindexchanging=”GridView1_PageIndexChanging”
onrowcancelingedit=”GridView1_RowCancelingEdit”
onrowdeleting=”GridView1_RowDeleting”onrowediting=”GridView1_RowEditing”
onrowupdating=”GridView1_RowUpdating”
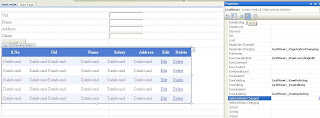
*Snapshot how to do set Events of GridView select the GridView and press f4

Or copy paste the following Source Code
<%@ Page Language=”C#” AutoEventWireup=”true”CodeFile=”user.aspx.cs” Inherits=”user” %>
<!DOCTYPE html PUBLIC “-//W3C//DTD XHTML 1.0 Transitional//EN”“http://www.w3.org/TR/xhtml1/DTD/xhtml1-transitional.dtd”>
<html xmlns=”http://www.w3.org/1999/xhtml”>
<head runat=”server”>
<title>Untitled Page</title>
<style type=”text/css”>
.style1
{
width100%;
}
.style2
{
}
</style>
</head>
<body>
<form id=”form1″ runat=”server”>
<table class=”style1″>
<tr>
<td class=”style2″>
Uid</td>
<td>
<asp:TextBox ID=”Txt_uid” runat=”server”></asp:TextBox>
</td>
</tr>
<tr>
<td class=”style2″>
Name</td>
<td>
<asp:TextBox ID=”Txt_Name” runat=”server”></asp:TextBox>
</td>
</tr>
<tr>
<td class=”style2″>
Address</td>
<td>
<asp:TextBox ID=”Txt_Address” runat=”server” Height=”22px” >
</asp:TextBox>
</td>
</tr>
<tr>
<td class=”style2″>
Salary</td>
<td>
<asp:TextBox ID=”Txt_Salary” runat=”server”></asp:TextBox>
</td>
</tr>
<tr>
<td class=”style2″>
&nbsp;</td>
<td>
<asp:Button ID=”Button1″ runat=”server” Height=”26px”onclick=”Button1_Click”
Text=”Insert” Width=”89px” />
</td>
</tr>
<tr>
<td class=”style2″>
&nbsp;</td>
<td>
&nbsp;</td>
</tr>
<tr>
<td class=”style2″ colspan=”2″>
<asp:GridView ID=”GridView1″ runat=”server”AutoGenerateColumns=”False”
CellPadding=”1″ ForeColor=”#333333″ GridLines=”None”
onpageindexchanging=”GridView1_PageIndexChanging”
onrowcancelingedit=”GridView1_RowCancelingEdit”
onrowdeleting=”GridView1_RowDeleting”onrowediting=”GridView1_RowEditing”
onrowupdating=”GridView1_RowUpdating” CellSpacing=”1″>
<RowStyle BackColor=”#EFF3FB” />
<Columns>
<asp:TemplateField HeaderText=”S.No”>
<ItemTemplate>
<%#Container.DataItemIndex +1 %>
<asp:Label ID=”Label5″ runat=”server”></asp:Label>
</ItemTemplate>
</asp:TemplateField>
<asp:TemplateField HeaderText=”Uid”>
<ItemTemplate>
<asp:Label ID=”Label1″ runat=”server” Text=’<%# Eval(“uid”) %>‘></asp:Label>
<asp:Label ID=”lb_id” runat=”server” Text=’<%# Eval(“id”) %>‘></asp:Label>
</ItemTemplate>
<EditItemTemplate>
<asp:Label ID=”lbl_edit” runat=”server” Text=’<%# Eval(“id”) %>‘></asp:Label>
</EditItemTemplate>
</asp:TemplateField>
<asp:TemplateField HeaderText=”Name”>
<ItemTemplate>
<asp:Label ID=”Label2″ runat=”server” Text=’<%# Eval(“Name”) %>‘></asp:Label>
</ItemTemplate>
<EditItemTemplate>
<asp:TextBox ID=”txt_ename” runat=”server” Text=’<%# Eval(“name”)%>‘></asp:TextBox>
</EditItemTemplate>
</asp:TemplateField>
<asp:TemplateField HeaderText=”Salary”>
<ItemTemplate>
<asp:Label ID=”Label3″ runat=”server” Text=’<%# Eval(“Salary”) %>‘></asp:Label>
</ItemTemplate>
<EditItemTemplate>
<asp:TextBox ID=”txt_esal” runat=”server” Text=’<%# Eval(“Salary”)%>‘></asp:TextBox>
</EditItemTemplate>
</asp:TemplateField>
<asp:TemplateField HeaderText=”Address”>
<ItemTemplate>
<asp:Label ID=”Label4″ runat=”server” Text=’<%# Eval(“Address”) %>‘></asp:Label>
</ItemTemplate>
<EditItemTemplate>
<asp:TextBox ID=”txt_eadd” runat=”server” Height=”81px”
Text=’<%# Eval(“address”) %>
TextMode=”MultiLine” Width=”246px”></asp:TextBox>
</EditItemTemplate>
</asp:TemplateField>
<asp:TemplateField HeaderText=”Edit”>
<ItemTemplate>
<asp:LinkButton ID=”LinkButton1″ runat=”server”CommandName=”edit”>Edit</asp:LinkButton>
</ItemTemplate>
<EditItemTemplate>
<asp:LinkButton ID=”LinkButton2″ runat=”server”CommandName=”update”>Update</asp:LinkButton>
&nbsp;<asp:LinkButton ID=”LinkButton3″ runat=”server”CommandName=”cancel”>Cancel</asp:LinkButton>
</EditItemTemplate>
</asp:TemplateField>
<asp:TemplateField HeaderText=”Delete”>
<ItemTemplate>
<asp:LinkButton ID=”LinkButton4″ runat=”server” CommandName=”delete”
onclientclick=”return confirm(‘Are you sure want to delete the current record ?’)”>Delete</asp:LinkButton>
</ItemTemplate>
</asp:TemplateField>
</Columns>
<FooterStyle BackColor=”#507CD1″ Font-Bold=”True” ForeColor=”White”/>
<PagerStyle BackColor=”#2461BF” ForeColor=”White”HorizontalAlign=”Center” />
<SelectedRowStyle BackColor=”#D1DDF1″ Font-Bold=”True”ForeColor=”#333333″ />
<HeaderStyle BackColor=”#507CD1″ Font-Bold=”True” ForeColor=”White”/>
<EditRowStyle BackColor=”#FF9999″ />
<AlternatingRowStyle BackColor=”White” />
</asp:GridView>
</td>
</tr>
<tr>
<td class=”style2″>
&nbsp;</td>
<td>
&nbsp;</td>
</tr>
<tr>
<td class=”style2″>
&nbsp;</td>
<td>
&nbsp;</td>
</tr>
</table>
<div>
</div>
</form>
</body>
</html>

Snapshots
CODING
using System;
using System.Collections;
using System.Configuration;
using System.Data;
using System.Linq;
using System.Web;
using System.Web.Security;
using System.Web.UI;
using System.Web.UI.HtmlControls;
using System.Web.UI.WebControls;
using System.Web.UI.WebControls.WebParts;
using System.Xml.Linq;
using System.Data.SqlClient;  // add the namespace

public partial class user : System.Web.UI.Page
{
SqlConnection con = new SqlConnection(); // for connection
SqlCommand cmd;
DataTable dt;
SqlDataAdapter adp;
protected void Page_Load(object sender, EventArgs e)
{
con.ConnectionString =ConfigurationManager.ConnectionStrings["cnn"].ConnectionString;//accessing connection name from Web.config
con.Open();
if (con.State == ConnectionState.Closed)
{
con.Open();
}
con.Close();

if (IsPostBack == false)
{
grdview(); // calling the grdview function
}
}
private void grdview()
{
if (con.State == ConnectionState.Closed)
{
con.Open();
}
adp = new SqlDataAdapter(“select * from tbuser order by id desc”, con); //fetching the records from table
dt = new DataTable();
adp.Fill(dt);
if (dt.Rows.Count == 0)
{
Response.Write(“No record found”);
}
else
{
GridView1.DataSource = dt;
GridView1.DataBind();
}
con.Close();
}


protected void Button1_Click(object sender, EventArgs e)
{
if (con.State == ConnectionState.Closed)
{
con.Open();
}
adp = new SqlDataAdapter(“Select uid from tbuser where uid=@uid”, con); // will check the uid if exists then display else condition
adp.SelectCommand.Parameters.AddWithValue(“@uid”, Txt_uid.Text);
dt = new DataTable();
adp.Fill(dt);
adp.Dispose();
if (dt.Rows.Count == 0)
{
// will insert the unique record of uid
cmd = new SqlCommand(“insert into tbuser values(@uid,@Name,@Address,@Salary)”, con);
cmd.Parameters.AddWithValue(“@uid”, Txt_uid.Text);
cmd.Parameters.AddWithValue(“@Name”, Txt_Name.Text);
cmd.Parameters.AddWithValue(“@Address”, Txt_Address.Text);
cmd.Parameters.AddWithValue(“@Salary”, Txt_Salary.Text);
cmd.ExecuteNonQuery();
cmd.Dispose();
con.Close();
grdview();
}
else
{
Response.Write(“user name is already exits”);
}}
protected void GridView1_PageIndexChanging(object sender,GridViewPageEventArgs e)
{
GridView1.PageIndex = e.NewPageIndex; // for pageindexing
grdview();
}
protected void GridView1_RowCancelingEdit(object sender,GridViewCancelEditEventArgs e)
{
GridView1.EditIndex = -1; // will cancel the updating
grdview();
}
protected void GridView1_RowDeleting(object sender,GridViewDeleteEventArgs e)
//will delete the Record
Label id = ((Label)(GridView1.Rows[e.RowIndex].FindControl(“lb_id”))); // here we will find the label name “lb_id” which is bound with
//field name id
if (con.State == ConnectionState.Closed)
{ con.Open(); }
cmd = new SqlCommand(“delete from  tbuser where id=@id”, con);
cmd.Parameters.AddWithValue(“@id”, id.Text);
cmd.ExecuteNonQuery();
cmd.Dispose();
con.Close();
grdview();
}

protected void GridView1_RowEditing(object sender,GridViewEditEventArgs e)
{
GridView1.EditIndex = e.NewEditIndex;
grdview();
}
protected void GridView1_RowUpdating(object sender,GridViewUpdateEventArgs e)
{
// The label which is in Edittemplate name “lbl_edit” bind with id field from the table
Label id = ((Label)(GridView1.Rows[e.RowIndex].FindControl(“lbl_edit”))) ;
if (con.State == ConnectionState.Closed)
{ con.Open(); }
//In edittemplate where we placed the textbox which were bind with the fields and here we will find the
// controls and will access the fields and update the records
cmd = new SqlCommand(“update tbuser set name=@name,salary=@salary,address=@address where id=@id”, con);
cmd.Parameters.AddWithValue(“@name”, ((TextBox)(GridView1.Rows[e.RowIndex].FindControl(“txt_ename”))).Text);//name
cmd.Parameters.AddWithValue(“@salary”Convert.ToInt32(((TextBox)(GridView1.Rows[e.RowIndex].FindControl(“txt_esal”))).Text));//salary
cmd.Parameters.AddWithValue(“@address”, ((TextBox)(GridView1.Rows[e.RowIndex].FindControl(“txt_eadd”))).Text);//address
cmd.Parameters.AddWithValue(“@id”, id.Text);//id
cmd.ExecuteNonQuery();
cmd.Dispose();
GridView1.EditIndex = -1;
con.Close();
grdview();
}}

Following Snapshots
Select the GridView and click on the Columns and add the TemplateField.
Following the image will show the Edit Templates option click on it and it will open the Itemtemplate and Edit template fields.
Following image after click on the Edit Templates

Select the Edit Linkbutton and set the CommandName =”edit” and for Update is “update”, Cancel=”cancel” and for Delete =”delete”

Inserting the records and displaying the user name is already exists…

Editing the records after click the EDIT button and it will open the Edittemplate where we place the Textbox controls
Here the data will delete after confirmation of the record when we click on DELETE button.