
Part 1 - Listing Data from Database:
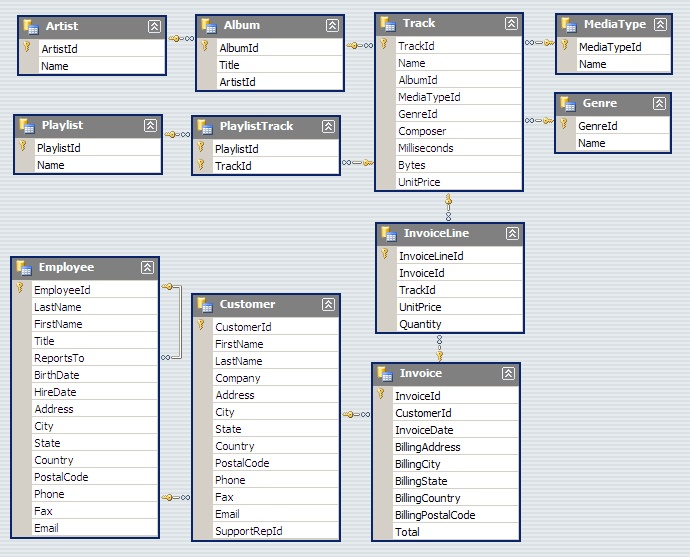
Let us now learn ASP.NET MVC 2 from Scratch by actually developing a front end website for the Chinook database, which is an alternative to the traditional Northwind database. You can get the Chinook database from here. As always the best way to learn something is by working on it and doing something. The Chinook database has the following schema, a quick look will help us implementing the application in a efficient way.
Let us first implement a grid view table with the list of Employees with some details, this table also has the Details, Edit and Delete buttons on it to do some operations. This is series of post will concentrate on creating a simple CRUD front end for Chinook DB using ASP.NET MVC 2.
In this post, we will look at listing all the possible Employees in the database in a tabular format, from which, we can then edit and delete them as required. In this post, we will concentrate on setting up our environment and then just designing a page to show a tabular information from the database.
We need to first setup the SQL Server database, you can download the required version and then set it up in your localhost. Then we need to add the LINQ to SQL Classes required for us to enable interaction with our database.

Now after you do the above step, just use your Server Explorer in VS 2010 to actually navigate to the database, expand the tables node and then drag drop all the tables onto the Object Relational Designer space and you go you will have the tables visualized as classes.

As simple as that.

Now for the purpose of displaying the data from Employee in a table, we will show only the EmployeeID, Firstname and lastname. So let us create a class to hold this information. So let us add a new class called EmployeeList to the ViewModels. We will send this data model to the View and this can be displayed in the page.
public class EmployeeList
{
public int EmployeeID { get; set; }
public string Firstname { get; set; }
public string Lastname { get; set; }
public EmployeeList(int empID, string fname, string lname)
{
this.EmployeeID = empID; this.Firstname = fname; this.Lastname = lname;
}
}
Ok now we have got the backend ready. Let us now look at the front end view now. We will first create a master called Site.Master and reuse it across the site. The Site.Master content will be
<%@ Master Language="C#" AutoEventWireup="true" CodeBehind="Site.Master.cs" Inherits="ChinookMvcSample.Views.Shared.Site" %>
<!DOCTYPE html PUBLIC "-//W3C//DTD XHTML 1.0 Transitional//EN" "http://www.w3.org/TR/xhtml1/DTD/xhtml1-transitional.dtd">
<html xmlns="http://www.w3.org/1999/xhtml">
<head id="Head1" runat="server">
<title></title>
<style type="text/css">
html
{
background-color: gray;
}
.content
{
width: 880px;
position: relative;
background-color: #ffffff;
min-width: 880px;
min-height: 800px;
float: inherit;
text-align: justify;
}
</style>
<script src="../../Scripts/jquery-1.4.1.min.js" type="text/javascript"></script>
<asp:ContentPlaceHolder ID="head" runat="server">
</asp:ContentPlaceHolder>
</head>
<body>
<center>
<h1>
My Website</h1>
<div class="content">
<asp:ContentPlaceHolder ID="body" runat="server">
</asp:ContentPlaceHolder>
</div>
</center>
</body>
</html>
The backend Site.Master.cs does not contain anything. In the actual Index.aspx view, we add the code to simply iterate through the collection of EmployeeList that was sent to the View via the Controller. So in the top of the Index.aspx view, we have this inherits which says
Inherits="System.Web.Mvc.ViewPage<IEnumerable<ChinookMvcSample.ViewModels.EmployeeList>>"
In this above line, we dictate that the page is consuming a IEnumerable collection of EmployeeList. So once we specify this and compile the project. Then in our Index.aspx page, we can consume the EmployeeList object and access all its methods and properties.
<table class="styled" cellpadding="3" border="0" cellspacing="0">
<tr>
<th colspan="3">
</th>
<th>
First Name
</th>
<th>
Last Name
</th>
</tr>
<% foreach (var item in Model)
{ %>
<tr>
<td align="center">
<%: Html.ActionLink("Edit", "Edit", new { id = item.EmployeeID }, new { id = "links" })%>
</td>
<td align="center">
<%: Html.ActionLink("Details", "Details", new { id = item.EmployeeID }, new { id = "links" })%>
</td>
<td align="center">
<%: Html.ActionLink("Delete", "Delete", new { id = item.EmployeeID }, new { id = "links" })%>
</td>
<td>
<%: item.Firstname %>
</td>
<td>
<%: item.Lastname %>
</td>
</tr>
<% } %>
<tr>
<td colspan="5">
<%: Html.ActionLink("Create New", "Create") %>
</td>
</tr>
</table>
The Html.ActionLink is a Html Helper to a create a hyperlink in the page, in the one we have used, the first parameter is the text that is to be used for the hyperlink, second one is the action name, third one is the parameter to be passed, last one is the attributes to be added while the hyperlink is rendered in the page. Here we are adding the id=”links” to the hyperlinks that is created in the page.
In the index.aspx page, we add some jQuery stuff add alternate row colours and highlight colours for rows on mouse over.

Now the Controller that handles the requests and directs the request to the right view. For the index view, the controller would be
public ActionResult Index()
{
//var Employees = from e in data.Employees select new EmployeeList(e.EmployeeId,e.FirstName,e.LastName);
//return View(Employees.ToList());
return View(_data.Employees.Select(p => new EmployeeList(p.EmployeeId, p.FirstName, p.LastName)));
}
Let us also write a unit test using NUnit for the above, just testing EmployeeController’s Index.
DataClasses1DataContext _data;
public EmployeeControllerTest()
{
_data = new DataClasses1DataContext("Data Source=(local);Initial Catalog=Chinook;Integrated Security=True");
}
[Test]
public void TestEmployeeIndex()
{
var e = new EmployeeController(_data);
var result = e.Index() as ViewResult;
var employeeList = result.ViewData.Model;
Assert.IsNotNull(employeeList, "Result is null.");
}
In the first EmployeeControllerTest constructor, we set the data context to be used while running the tests. And then in the actual test, We just ensure that the View results returned by Index is not null.
Here is the zip of the entire solution files until this point. Let me know if you have any doubts or clarifications.
Cheers! Have a nice day.
No comments:
Post a Comment