
Using the ASP.NET Calendar control in an ASP.NET project
This section was created only for beginners who haven't used the ASP.NET Calendar in a Web Project. Feel free to skip this section if you already know about it.
Running the sample
- Download and extract the zip file.
- Set SimpleCalendar.aspx as the Start Page.
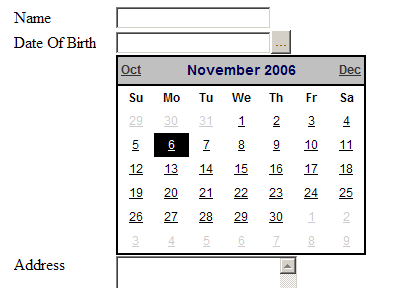
- Run the web application. You will see the result below if you click the "..." button near the Date Of Birth textbox.
- If you choose a date from the Calendar control, then the selected date will be shown in the textbox and the calendar will disappear.
Do you want to try this code in your own project?
Lab: Using the ASP.NET control in an ASP.NET project
- Create an ASP.NET Web Project (C#).
- Place a
TextBoxand aButtonin a WebForm. - Add a
Calendarcontrol to the WebForm.
(Thanks to the author of this article for a custom style calendar control. You can remove the style if you don't want to customize the appearance.) - Add the following code in the
Button'sClickevent: - Add the following code in the
SelectionChangedevent of the calendar: - Finally, run your web application. You will see the same result as the picture above. That's. It is simple, isn't it?
<asp:TextBox ID="txtDOB" Runat="server"></asp:TextBox>
<asp:Button ID="btnDOB" Runat="server" Text="..."></asp:Button>
<asp:calendar id="cdrCalendar" runat="server"
  backcolor="#ffffff" width="250px" height="200px"
  font-size="12px" font-names="Arial" borderwidth="2px"
  bordercolor="#000000" nextprevformat="shortmonth"
  daynameformat="firsttwoletters" Visible="False">
  <TodayDayStyle ForeColor="White" BackColor="Black"></TodayDayStyle>
  <NextPrevStyle Font-Size="12px" Font-Bold="True" ForeColor="#333333">
  </NextPrevStyle>
  <DayHeaderStyle Font-Size="12px" Font-Bold="True"></DayHeaderStyle>
  <TitleStyle Font-Size="14px" Font-Bold="True" BorderWidth="2px"
     ForeColor="#000055"></TitleStyle>
  <OtherMonthDayStyle ForeColor="#CCCCCC"></OtherMonthDayStyle>
</asp:calendar>
try
{
  if(txtDOB.Text.Trim() != "")
      cdrCalendar.SelectedDate = Convert.ToDateTime(txtDOB.Text);
}
catch
{}
cdrCalendar.Visible= true;  //showing the calendar.
//displaying the selected date in TextBox
txtDOB.Text = cdrCalendar.SelectedDate.ToString();
cdrCalendar.Visible= false; //hiding the calendar.
Showing the ASP.NET Calendar control in a popup window
Now we have some idea about how to use the ASP.NET Calendar control. We can now try to improve our code. How about showing the Calendar in a pop-up window? Let's see...
Running the sample
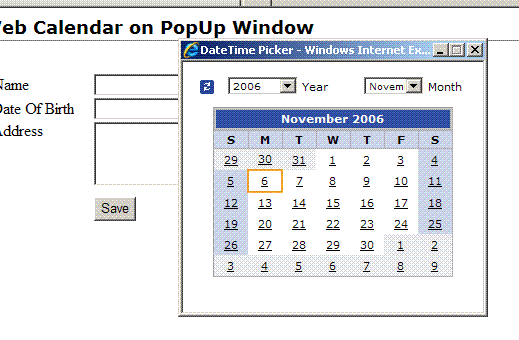
- Set PopupCalendar.aspx as the Start Page.
- Run the web application. You will see the calendar in the pop-up window as in the picture below.
Lab: Adding a pop-up Calendar control in your ow project
Here are some facts if you want to try this code in your own project:
- Three things you need to copy from the demo project to your project
- Calendar.aspx under the Controls folder
- Styles.css under CSS
- pdate.gif and today.png under Images
- Two things you might need to check:
- Path of the CSS of the Calendar control:
- Path of the Calandar image:
- Three things you need to add to the page that you want the Calendar to display in:
TextBoxandHyperLink- Adding a JavaScript function to the open pop-up window
- Calling a JavaScript function:
- Finally, you can start running your project and check whether it's working fine or not.
<link href="../CSS/Styles.css" type="text/css" rel="stylesheet">
<asp:imagebutton id="BtnRefresh" runat="server"
    ToolTip="Refresh" ImageUrl="../Images/today.png">
</asp:imagebutton>
<asp:TextBox ID="txtDOB" Runat="server"></asp:TextBox>
<asp:HyperLink id="imgDate" runat="server"
    ImageUrl="Images/pdate.gif">HyperLink</asp:HyperLink>
<script language="javascript" type="text/javascript">
function calendarPicker(strTxtRef)
{
  window.open('./Controls/Calendar.aspx?field=' + strTxtRef   +
      '','calendarPopup','titlebar=no,left=470,top=100,' +
      'width=300,height=250,resizable=no');
}
</script>
imgDate.NavigateUrl =
     "javascript:calendarPicker('document.Form1." +
      txtDOB.ClientID.ToString() + "');";
Note: Form1 is the name of the web form that you want the calendar to display on it. If you are not sure about it, go to HTML view and check it. For example:<form id="Form1" method="post" runat="server">
Using the Yahoo.UI.Calendar control in an ASP.NET project
Personally, I don't like that much about showing something in a pop-up window. So I was looking for something better. Then I came to know about the Yahoo! UI Library, which is an amazing JavaScript library, and it is compatible with most popular browsers. Let's take a look at the demo.
Running the sample project
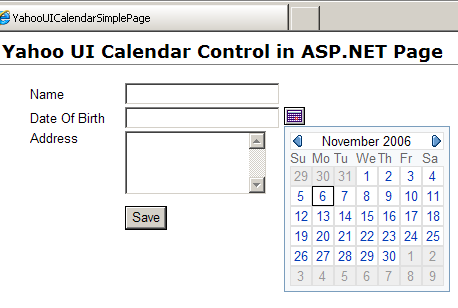
- Set YahooUICalendarSimplePage.aspx as the Start Page.
- Run the web application. You will see the calendar in a pop-up window as in the following picture.
Lab: How to use Yahoo.UI.Calendar in your own ASP.NET project
You need to add the following stylesheets, JavaScript files, and images in your project.
- Stylesheets
- calendar.css
- dpSyntaxHighlighter.css
- fonts.css
- reset.css
- Stylesheets
- calendar.js
- dom.js
- event.js
- yahoo.js
- Image
- pdate.gif
In the ASPX file:
- Add the following code in the
HEADtag: - Put the following code in the
Bodytag:
<script type="text/javascript" src="./JS/yahoo.js"></script>
<script type="text/javascript" src="./JS/event.js"></script>
<script type="text/javascript" src="./JS/dom.js"></script>

<link type="text/css" rel="stylesheet" href="./CSS/fonts.css">
<link type="text/css" rel="stylesheet" href="./CSS/reset.css">
<link rel="stylesheet" type="text/css"
         href="./CSS/dpSyntaxHighlighter.css">

<script type="text/javascript" src="./JS/calendar.js"></script>

<link type="text/css" rel="stylesheet" href="./CSS/calendar.css">

<script language="javascript">
YAHOO.namespace("example.calendar");

function init() {
  YAHOO.example.calendar.cal1 = new YAHOO.widget.Calendar(
      "YAHOO.example.calendar.cal1",
      "cal1Container");
  YAHOO.example.calendar.cal1.title = "Select the desired workout day:";

  YAHOO.example.calendar.cal1.onSelect = setDate1;
  YAHOO.example.calendar.cal1.render();

}

function showCalendar1(txtDateClientID,btnCalendarID) {
  this.link1 = document.getElementById(btnCalendarID);
  this.oTxtDate = document.getElementById(txtDateClientID);
  var pos = YAHOO.util.Dom.getXY(link1);
  YAHOO.example.calendar.cal1.oDomContainer.style.display='block';
  YAHOO.util.Dom.setXY(YAHOO.example.calendar.cal1.oDomContainer,
                       [pos[0],pos[1]+link1.offsetHeight+1]);
}

function setDate1() {
  var date1 = YAHOO.example.calendar.cal1.getSelectedDates()[0];
  YAHOO.example.calendar.cal1.oDomContainer.style.display='none';
  var formattedDate = date1;
  oTxtDate.value = formattedDate.getDate()+'/'+
       (formattedDate.getMonth() +1) +'/'+ formattedDate.getFullYear();
}

YAHOO.util.Event.addListener(window, "load", init);
</script>
Note
YAHOO.example.calendar.cal1.getSelectedDates() in thesetDate1() function will return the selected date in the long date format. Even though I have converted the long date format to short date format (DD/MM/YYYY), you can remove the last line if you don't need it. "cal1Container" in init() is the ID of the DIV where theYahoo.UI.Calendar support is to be attached.<div id="cal1Container" style="DISPLAY: none; POSITION: absolute" ></div>
<asp:TextBox ID="txtDOB" Runat="server"></asp:TextBox>
<a id="chooseday" onclick="showCalendar1('<% =txtDOB.ClientID %>',
'imgCalendar')" href="javascript:void(null)">
<IMG id="imgCalendar" border="0"
alt="" src="Images/pdate.gif">
Note:
If you are using an HTML textbox in your page, you can just pass the ID of the textbox to theshowCalendar1() function. In case the calendar is showing behind another control, you can set a higher Z-ORDER for thecallContainer DIV which will be attached by Yahoo.UI.Calendar.Update
Please take a look at this article if you want to add
Yahoo.UI.Calendar in theBasePage or MasterPage.
No comments:
Post a Comment