Friday 17 May 2013

Display Files saved in Database Table in ASP.Net GridView with Download button

Display Files saved in Database Table in ASP.Net GridView with Download button

Display Files saved in Database Table in ASP.Net GridView with Download option
 
HTML Markup
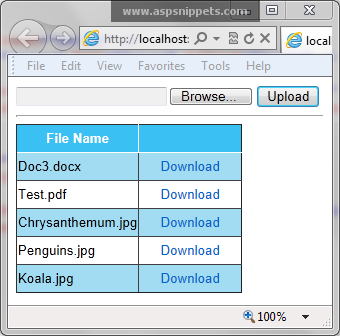
The HTML Markup contains a FileUpload and Button to upload and save the files to database and an ASP.Net GridView control to display the uploaded files and also to allow the user to download the file saved in database. The ID of the File is bound to the CommandArgument property of the LinkButton. it will later be used to download the file.
<asp:FileUpload ID="FileUpload1" runat="server" />
<asp:Button ID="btnUpload" runat="server" Text="Upload" OnClick="Upload" />
<hr />
<asp:GridView ID="GridView1" runat="server" HeaderStyle-BackColor="#3AC0F2" HeaderStyle-ForeColor="White"
    RowStyle-BackColor="#A1DCF2" AlternatingRowStyle-BackColor="White" AlternatingRowStyle-ForeColor="#000"
    AutoGenerateColumns="false">
    <Columns>
        <asp:BoundField DataField="Name" HeaderText="File Name"/>
        <asp:TemplateField ItemStyle-HorizontalAlign = "Center">
            <ItemTemplate>
                <asp:LinkButton ID="lnkDownload" runat="server" Text="Download" OnClick="DownloadFile"
                    CommandArgument='<%# Eval("Id") %>'></asp:LinkButton>
            </ItemTemplate>
        </asp:TemplateField>
    </Columns>
</asp:GridView>
 
 
Namespaces
You will need to import the following namespaces
C#
using System.IO;
using System.Data;
using System.Data.SqlClient;
using System.Configuration;

VB.Net
Imports System.IO
Imports System.Data
Imports System.Data.SqlClient
Imports System.Configuration
 
Uploading the files and then saving in SQL Server Database table
The below event handler gets executed when the Upload Button is clicked, it simply saves the file as Binary data in the SQL Server Database
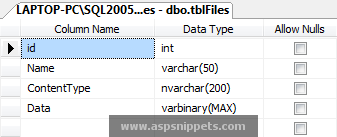
The name of the file, the content type (MIME type) and the actual file as array of bytes are inserted into the database table.
Note: The Content type (MIME type) is very important while downloading the files as it notifies the browser about type of the File

C#
protected void Upload(object sender, EventArgs e)
{
    string filename = Path.GetFileName(FileUpload1.PostedFile.FileName);
    string contentType = FileUpload1.PostedFile.ContentType;
    using (Stream fs = FileUpload1.PostedFile.InputStream)
    {
        using (BinaryReader br = new BinaryReader(fs))
        {
            byte[] bytes = br.ReadBytes((Int32)fs.Length);
            string constr = ConfigurationManager.ConnectionStrings["constr"].ConnectionString;
            using (SqlConnection con = new SqlConnection(constr))
            {
                string query = "insert into tblFiles values (@Name, @ContentType, @Data)";
                using (SqlCommand cmd = new SqlCommand(query))
                {
                    cmd.Connection = con;
                    cmd.Parameters.AddWithValue("@Name", filename);
                    cmd.Parameters.AddWithValue("@ContentType", contentType);
                    cmd.Parameters.AddWithValue("@Data", bytes);
                    con.Open();
                    cmd.ExecuteNonQuery();
                    con.Close();
                }
            }
        }
    }
    Response.Redirect(Request.Url.AbsoluteUri);
}

Displaying the uploaded files from Database Table in ASP.Net GridView
Below is the code which populates the ASP.Net GridView from files saved in the database table.
C#
protected void Page_Load(object sender, EventArgs e)
{
    if (!IsPostBack)
    {
        BindGrid();
    }
}
private void BindGrid()
{
   string constr = ConfigurationManager.ConnectionStrings["constr"].ConnectionString;
    using (SqlConnection con = new SqlConnection(constr))
    {
        using (SqlCommand cmd = new SqlCommand())
        {
            cmd.CommandText = "select Id, Name from tblFiles";
            cmd.Connection = con;
            con.Open();
            GridView1.DataSource = cmd.ExecuteReader();
            GridView1.DataBind();
            con.Close();
        }
    }
}
Downloading particular file from Database Table using the Download Button in GridView
The below event handler is raised when the Download LinkButton is clicked inside the GridView Row. Firstly the ID of the File is determined using the CommandArgument property of the LinkButton and then the File data, i.e. Name, Content Type and the Byte Array is fetched from the database.
Once the data fetching process is completed the file is sent to the browser for downloading using the Response Stream
C#
protected void DownloadFile(object sender, EventArgs e)
{
    int id = int.Parse((sender as LinkButton).CommandArgument);
    byte[] bytes;
    string fileName, contentType;
    string constr = ConfigurationManager.ConnectionStrings["constr"].ConnectionString;
    using (SqlConnection con = new SqlConnection(constr))
    {
        using (SqlCommand cmd = new SqlCommand())
        {
            cmd.CommandText = "select Name, Data, ContentType from tblFiles where Id=@Id";
            cmd.Parameters.AddWithValue("@Id", id);
            cmd.Connection = con;
            con.Open();
            using (SqlDataReader sdr = cmd.ExecuteReader())
            {
                sdr.Read();
                bytes = (byte[])sdr["Data"];
                contentType = sdr["ContentType"].ToString();
                fileName = sdr["Name"].ToString();
            }
            con.Close();
        }
    }
    Response.Clear();
    Response.Buffer = true;
    Response.Charset = "";
    Response.Cache.SetCacheability(HttpCacheability.NoCache);
    Response.ContentType = contentType;
    Response.AppendHeader("Content-Disposition""attachment; filename=" + fileName);
    Response.BinaryWrite(bytes);
    Response.Flush();
    Response.End();
}
 
Display Files saved in Database Table in ASP.Net GridView with Download option
 

No comments:

Post a Comment