
Inserting Form Data Into DataBase and Display In GridView
Background
I have decided to write this article after considering the requirements of students and beginners that often ask how to insert form data and display the data in a gridview programmatically using a Single Stored Procedure. As a result I have explained those requirements with the basics so they can get an idea of how to submit form data and display it in a gridview using a single Stored Procedure.
So let us start the walkthrough.
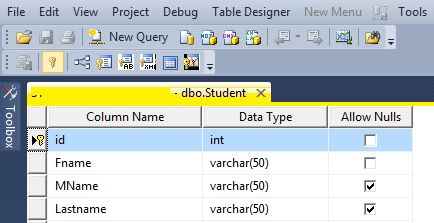
Create a table "Student" as in the following:
Create a Stored Procedure named "Studenentryview" as:
Create procedure studentEntryView
(
@Action varchar (10),
@fname Varchar (50),
@Mname varchar (50),
@Lname Varchar (50)
)
as
begin
If @Action='Insert' --used to insert recordsBegin
Insert into Student (Fname,MName,Lastname) values (@fname,@Mname,@Lname)
End
else if @Action='View' --used to view recordsBeginselect *from Student End
End
In the preceding Stored Procedure I have declared four variables, they are @Action, @fname, @Mname and @Lname to store Fname, MName and Lastname into the table and the action is used to perform the exact operation; that is view or display as the user requests; in other words if the user inserts the record then the Insert action is executed and if user the user views the record then the view action is to be executed.
Now create the one sample application "StudentEntryView" as:
- Start - All Programs - Microsoft Visual Studio 2010.
- File - New Website - C# - Empty website (to avoid adding a master page).
- Provide the web site a name such as "StudentEntryView" or another as you wish and specify the location.
- Then right-click on Solution Explorer - Add New Item - Default.aspx page.
- Drag and drop one button, three textboxes, one gridview and two hidden fields to pass the hidden value to the database and one label on the <form> section of the Default aspx page.
Then switch to the design view; the <form> section of the Default aspx page source will look as in the following:
<form id="form1"runat="server">
<div>
First Name <asp:TextBox ID="TextBox1" runat="server"></asp:TextBox>
Middle Name<asp:TextBox ID="TextBox2" runat="server"></asp:TextBox>
Last Name <asp:TextBox ID="TextBox3" runat="server"></asp:TextBox>
<asp:ButtonID="Button1"runat="server"Text="Add"onclick="Button1_Click" />
</div>
<asp:HiddenFieldID="HiddenField1"runat="server"Value="insert" />
<asp:HiddenField ID="HiddenField2" runat="server" Value="View" />
<asp:GridViewID="GridView1"runat="server">
</asp:GridView>
</form>
In the preceding source code.
Insert Data To DataBase as
Double-click on "Button" then write the following code:
protected void Btnsave_Click(object sender, EventArgs e)
{
connection();
query = "studentEntryView"; //Stored Procedure name
SqlCommand com = new SqlCommand(query, con); //creating SqlCommand object
com.CommandType = CommandType.StoredProcedure; //here we declaring command type as stored Procedure
/* adding paramerters to SqlCommand below *\
com.Parameters.AddWithValue("@Action", HiddenField1.Value).ToString(); //for passing hidden value to preform insert operation
com.Parameters.AddWithValue("@FName",TextBox1.Text.ToString()); //first Name
com.Parameters.AddWithValue("@Mname ", TextBox2.Text.ToString()); //middle Name
com.Parameters.AddWithValue("@LName ",TextBox3.Text.ToString()); //Last Name
com.ExecuteNonQuery(); //executing the sqlcommand
Label1.Visible = true;
Label1.Text = "Records are Submitted Successfully";
}
In the preceding code, I have explained in detail in each line through comments what each line is used for and what purpose, I hope you understand it.
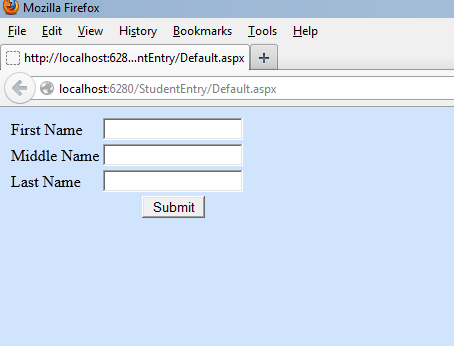
Now run the application; the starting page should be as follows:
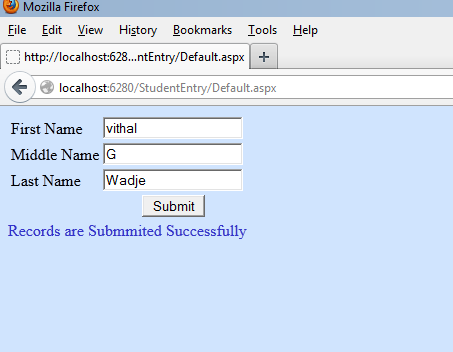
Now insert some data and click on the submit button, the following message will be shown after successful submission of the data:
Display Data In Gridview
Now we have inserted the data into the database as above, next we learn how to display the data in the gridview that we inserted above
Use the following code to display the data in the gridview at page load or any event that you want:
protected void Page_Load(object sender, EventArgs e)
{ connection();
query = "studentEntryView";
SqlCommand com = new SqlCommand(query, con);
com.CommandType = CommandType.StoredProcedure;
com.Parameters.AddWithValue("@Action", HiddenField2.Value).ToString();
DataSet ds =new DataSet();
SqlDataAdapter da = new SqlDataAdapter(com);
da.Fill(ds);
GridView1.DataSource = ds;
GridView1.DataBind();
}
In the preceding page load code the view action value of the hidden field is passed to the database and performs the exact block of code.
No comments:
Post a Comment