Bind data with GridView using SqlDataSource in Asp.Net
Accessing a remote database in .Net is relatively simple as compared to what we did during the Classic ASP era. One of .Net’s most powerful controls is theSqlDataSource, which allows web controls to easily access the database and its objects. SqlDataSource can be bound with another popular and useful control, the GridView control.


In this article, we’ll show you how to use both the controls in sync to produce great results on the web.
Start Microsoft Visual Studio and select “File -> New -> Web Site” from the top menu.

In the “New Web Site” window, give the site a name with a path and click ok.
In the “Default.aspx” file, select “Design” mode at the bottom left. Select the “Toolbox” from the task bar. Toolbox window will have a list of controls, packed inside the Tree view controls. Find “Data” and expand it. Doing so it will show you a list of Data Driven controls.

Well, so many of them. Don’t worry, we need just 2 controls from the list and it will be the “GridView” and “SqlDataSource” controls. Double click both the controls and it will be added on the web page. Close the “Toolbox” and click on the “SqlDataSource” control. This particular control will hold the database “tables” which will then be used to bind with other controls on the webpage. Here, we’ll bind it with the GridView control.
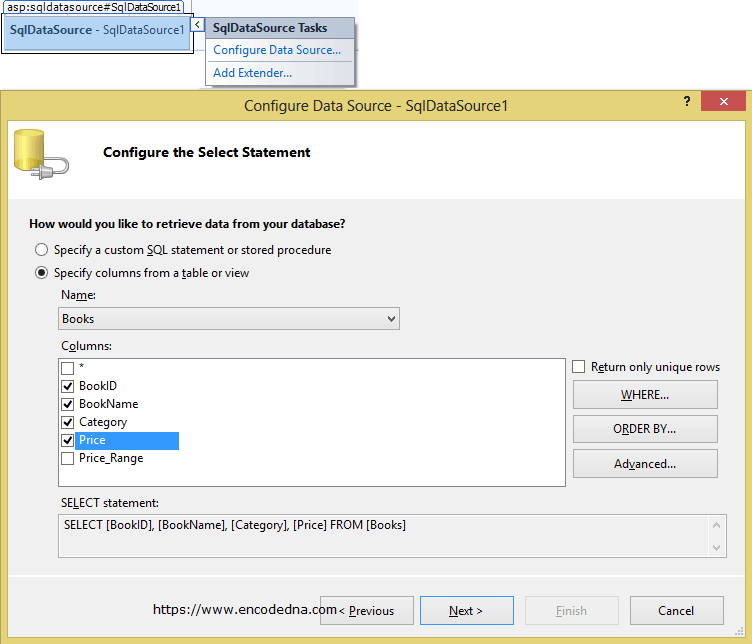
Selecting the “SqlDataSource” will show a right arrow which will allow us to “Configure Data Source”, or in simple words, “Connect to a Database”. Choose the database and tables you want to work with and follow the steps. You can select particular columns in a table for the GridView to display.

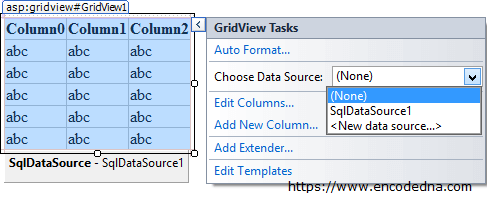
Once you have selected the database and table, select the GridView and click the “small left arrow”. It will show the “GridView Task” window, where you can choose the data source. The “Data Source” will be the one we have just created.

That’s it. We have bound the GridView with a database using Microsoft’s “SqlDataSource” control.
Before running this site on your local host, check if the “web.config” file has been configured properly. To check the file go to “Solution Explorer” and choose the “web.config” file. Inside the file, find <connectionStrings> tag and check if the connection string is properly set. (UserID, Password etc.)
<connectionStrings>
 <add name="DNA_ConnectionString" connectionString="Data Source=dna;
 Initial Catalog=DNA_CLASSIFIED;Integrated Security=True" providerName="System.Data.SqlClient"/>
</connectionStrings>

No comments:
Post a Comment