
Configuring AJAX PasswordStrength Control
Microsoft Ajax PasswordStrength Control
Have you seen the attractive bar that tells the user how strong the password is in Google mail? Ever wanted to implement that in your a own projects? It is easy with Microsoft Ajax PasswordStrength control.
The PasswordStrength Extender control is a part of the Microsoft Ajax Extensions which are available from Microsoft’s website as a separate install for Microsoft Visual Studio if you are using Visual Studio 2005. If you are using Visual Studio 2008, Microsoft Ajax is installed as a part of the IDE, but you may have to install the Ajax controls. For the purpose of this article we have assumed that you have the Ajax control toolkit installed on your system.
The PasswordStrength Extender is an extender Ajax control, i.e. it is not an independent control, but it extends the behavior of an existing ASP.Net control. The PasswordStrength extender extends the behavior of the Textbox control.
Using PasswordStrength Extender in Your Project
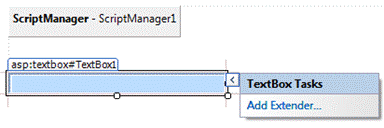
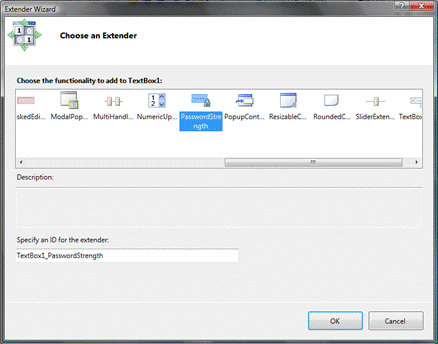
Since the PasswordStrength Extender works with a standard ASP.Net textbox, begin by placing a Textbox on your page. If you click on the textbox, you will notice the tiny arrow. Click on it and you will see a context menu with the command ‘Add Extender’. In the list that appears find the PasswordStrength extender and click ‘OK’.
Toggling to the ‘Source’ view, you will find the PasswordStrength control in your markup.
<cc1:PasswordStrength ID="TextBox1_PasswordStrength" runat="server"
Enabled="True" TargetControlID="TextBox1">
</cc1:PasswordStrength>
Notice that the TargetControlID property of the PasswordStrength control is set to the name of your Textbox. This is how the PasswordStrength Control Extender recognizes which Textbox it is supposed to work with.
Working With PasswordStrength Ajax Extender
The PasswordStrength Extender provides a number of properties that you can modify to set up the control’s look and functioning. Here are some of the important properties that you will want to modify.
DisplayPosition: Decides where you want to place the password strength prompt. This is in relation to the textbox the PasswordStrength Extender extends.
TextStrengthDescriptions: A semicolon separated list of prompts that the user will see based on the strength of the password. You can add as many prompts as you like, although usually 4 or 5 are enough.
PrefixText: The prefix to put before the prompt.
Let’s see how the PasswordStrength Control would look with these properties set.
<cc1:PasswordStrength ID="TextBox1_PasswordStrength" runat="server"
Enabled="True" TargetControlID="TextBox1" DisplayPosition="RightSide"PrefixText="Strength:"TextStrengthDescriptions="Poor;Weak;Average;Good;Excellent">
</cc1:PasswordStrength>
Here’s how the PasswordStrength looks with these settings.

Kind of boring. Isn’t it? Luckily this is not the only way the PasswordStrength Extender can look. If you don’t want the text, you can also display a bar instead. It also supports CSS so that you can modify the fonts and the appearance.
To change the appearance of the PasswordStrength Control, you can modify the following CSS properties.
TextCSSClass : Modify the appearance of the Passwordstrength Text.
BarBorderCSSClass : Modify the look of the Passwordstrength Bar’s border.
BarIndicatorCSSClass : Modify the appearance of the PasswordStrength Bar.
StrengthStyles : Up to three CSS class names separated by a comma to modify the look of the control according to the strength of the password.
HelpHandleCSSClass : CSS class for the dialog that displays the password requirements.
Let’s have a look at a PasswordStrength control configured to display a bar.

Here’s the code for the example above.
<%@ Page Language="C#" AutoEventWireup="true" CodeFile="Default.aspx.cs"Inherits="_Default" %>
<%@ Register Assembly="AjaxControlToolkit" Namespace="AjaxControlToolkit"TagPrefix="cc1" %>
<head runat="server">
<style>
.barBorder
{
border: solid 1px red;
width: 300px;
}
.barInternal
{
background: yellow;
}
.barInternalGreen
.barInternalGreen
{
background: green;
}
</style>
</head>
<body>
<form id="form1" runat="server">
<div>
<asp:ScriptManager ID="ScriptManager1" runat="server" />
<asp:TextBox TextMode="Password" ID="TextBox1"
runat="server"
Width="233px"></asp:TextBox>
<cc1:PasswordStrength ID="TextBox1_PasswordStrength"
runat="server" Enabled="True"
TargetControlID="TextBox1"
DisplayPosition="RightSide"
StrengthIndicatorType="BarIndicator"
BarBorderCssClass="barBorder"
BarIndicatorCssClass="barInternal">
</cc1:PasswordStrength>
</div>
</form>
</body>
</html>
Note that we have two new CSS classes in the document, and we have set the properties for BarBorderCssClass and BarIndicatorCssClass. Setting these CSS classes are important to display the PasswordStrength Bar. You can also display these classes in a separate stylesheet if you want.
If you want to make the PasswordStrength indicator look different for different levels of password strength, you can do that too. You can assign a list of semicolon separated CSS classes to the StrengthStyles property and the PasswordStrength extender will select the appropriate style on the basis of the current password’s strength. Example, the code below will make the bar indicator turn green if the password is at least 50% strong.
<cc1:PasswordStrength ID="TextBox1_PasswordStrength"
runat="server" Enabled="True"
TargetControlID="TextBox1"
DisplayPosition="RightSide"
StrengthStyles="barInternal;barInternalGreen"
</cc1:PasswordStrength>
Configuring PasswordStrength Extender
The PasswordStrength Extender also lets you decide the criterion for a good password. You can modify some simple properties to make the rules as easy or as tough as you want. Here are the properties to modify if you want to change the password rules.
CalculationWeightings : The password is composed of 4 elements – length, case, numerics and symbols. The CalculationWeightings property lets you assign importance to each one of them through a semicolon separated string. Example if you set the string ‘35;25;20;20’ then you’ve given 35% importance to length, 25% to casing, 20% to numerics and symbols each.
MinimumLowerCaseCharacters : The minimum number of lowercase characters that the password must have.
MinimumNumericCharacters : The minimum number of numeric characters that the password must have.
MinimumSymbolCharacters : The minimum number of symbol characters that the password must have.
MinimumUpperCaseCharacters : The minimum number of uppercase characters that should be in the password.
PrefferredPasswordLength : How long should be password be.
RequiresUpperAndLowerCaseCharacters : Set this flag to make mixed casing a requirement.
You can set these properties in the markup too, or you can also set them in the code-behind. In fact you can set all of the properties we’ve worked with in code-behind too. Let’s see an example of these properties and let’s set them in the codebehind.
protected void Page_Load(object sender, EventArgs e)
{
PassStrength.CalculationWeightings = "35;25;20;20";
PassStrength.MinimumLowerCaseCharacters = 2;
PassStrength.MinimumNumericCharacters = 2;
PassStrength.MinimumSymbolCharacters = 2;
PassStrength.MinimumUpperCaseCharacters = 2;
PassStrength.PreferredPasswordLength = 10;
PassStrength.RequiresUpperAndLowerCaseCharacters = true;
}
You can set these properties either in the Load event of the page, or in a separate procedure as long as you call it from the Load event. They will work the same as if you set them in the markup.
Unless you are working in an enterprise intranet situation where you have specific needs for the password, you shouldn’t go overboard with these settings. If you are making an Internet website that will have many users, don’t make a very strong password a requirement. Many users have their favorite word, or specific phrases as password that they find easier to remember. Preventing them from using them will make them unhappy.
However if you are making this for a bank or where sensitive data is handled, then you can use these settings to prompt the user to select a very secure password.
Finally
PasswordStrength Extender is a fast, efficient control that works by emitting pure javascript at the client side based on your settings. The control, a part of the free Microsoft Ajax Toolkit makes it easier to implement rich client features on your website.
You are now familiar with the control’s basic properties and know how to modify its appearance and behavior. You can now start using the Microsoft Ajax PasswordStrength Extender in your own projects.
No comments:
Post a Comment