
Creating Crystal Report and Sending Via Mail in ASP.NET
Crystal Reports is a mechanism which is used to create a report from various datasources, it is a popular report writing technique used to generate reports from different data sources and show to data in a report format. Crystal Reports allows users to graphically design data connection(s) and a report layout. Using Database Experts user / developers link the tables from various data sources (sql server, mysql, oracle, excel, access etc). Columns from the table are placed on the design surface of the report and can also be used in formulas for generating reports of a specific criteria. While generating the report you are given the flexibility to design it as per your requirements. Enough of this theory about crystal report we'll move to our example.
We'll create a crystal report based on a user's criteria ie a user will select a particular empid and we'll display the record of that employee in a report format.
Create a table in your sql server
create table Emp(EmpId int identity(1,1) not null,EmpName varchar(20)not null,EmpAdd varchar(20)not null,EmpCity varchar(20)not null,EmpState varchar(20)not null,EmpCountry varchar(10) default 'India')
insert into Emp values('vishal','Andheri','Mumbai','Maharashtra','India')insert into Emp values('Rahul','Virar','Thane','Maharashtra','India')insert into Emp values('John','Naigoan','Thane','Maharashtra','India')insert into Emp values('Pinky','Bandra','Mumbai','Maharashtra','India')insert into Emp values('Lincy','Worli','Mumbai','Maharashtra','India')
Now create a new Project in visual Studio 2005/ 2008 / 2010
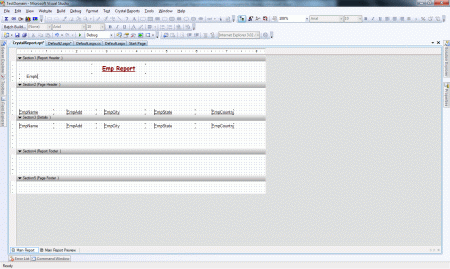
- For creation of a report first Open visual studio and create a new website.
- Add a new item to the website Cyrstal report.rpt.
- Select Blank report option from the wizard window.
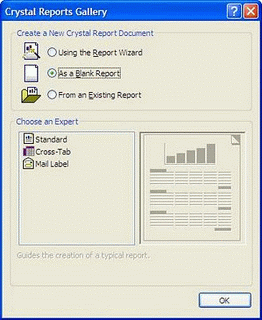
- Now Click Ok.
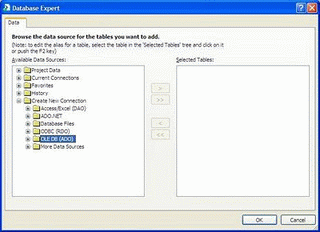
- You'll find that an cyrstal report is being added in your project now on the fields explorer select Database Expert or CrystalReports menu and select DataBase Expert.
Again right on the crystal report and select design-> page setup option, Specify the margin option which you like.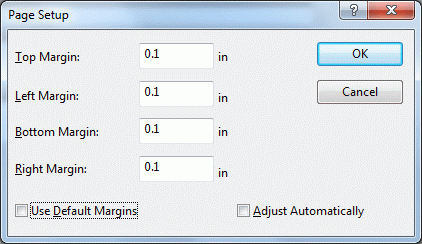
Now select fields explorer -> Database -> Database Expert. Or the same thing can be done through Crystal Report Menu which is appearing in the menu bar.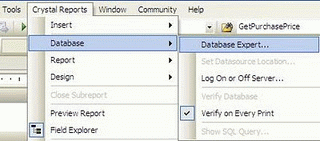
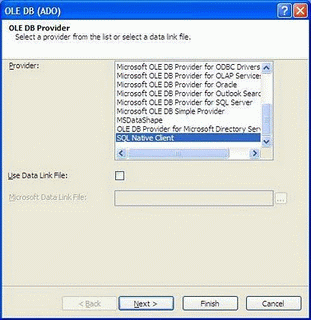
- Now in next window expand Create new connection section and OLEDB(ADO) and in next window Select Sql Native client.
- Now in next window enter your server name, user id, password to connect and the database to connect.
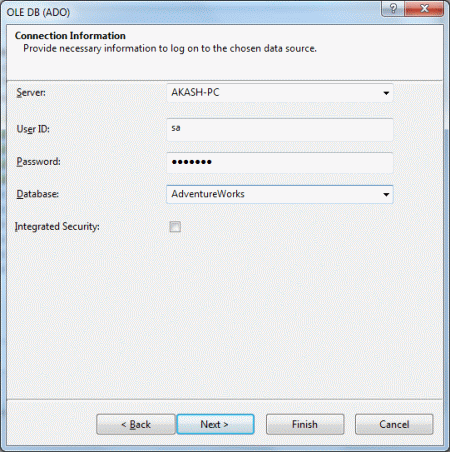
- Click Next and Finish.
- Now in next window select the tables whose data you want to display.
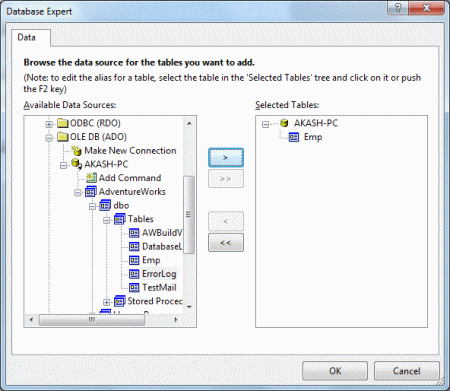
- Click ok. Now if you look at fields explorer in the database expert you'll find all the columns of the emp table is displayed. Now Start Desiging your report.
- If you want that your report columns should expand as and when the need grows then do the following things:
- Determine the columns whose data can grow for example in this I'm taking name.
- Right click on that columns in the details view and click on Format Object.
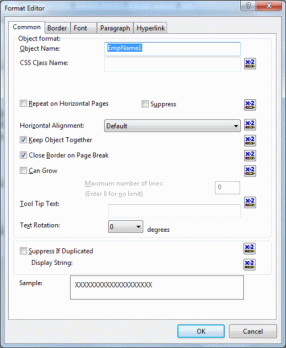
- Select the Can Grow checkbox and click ok.
- Determine the columns whose data can grow for example in this I'm taking name.
- Now we'll create a parameter fields for the crystal report ie when user will select an Id from the Drop Downlist on the web page and clicks on the submit button the records of that employee should be displayed in the crystal report. This can be done through parameterized variables or parameterized fields.
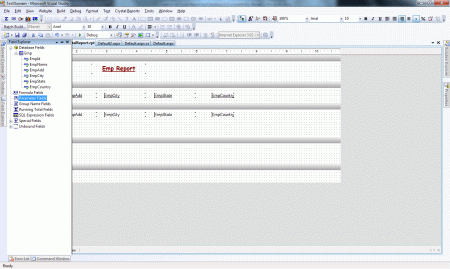
- Right click on the parameter fields click on new the following dialog box will appear fill in the proper details.
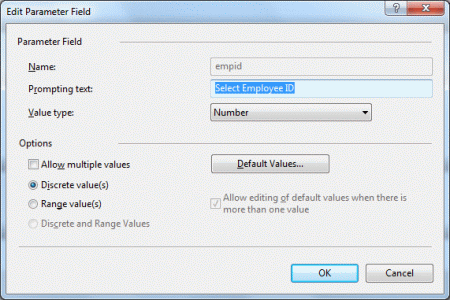
- We'll be passing values for this variable from the front end. You'll find that the empid parameterized variable is added in the parameter fields.
- Now click on Special Fields in Field Explorer and select Record Selection Formula and insert it into the pageFooter section of our crystal report webpage.
- Right click on it and click on Select Expert select Emp.EmpId from Report Fields.
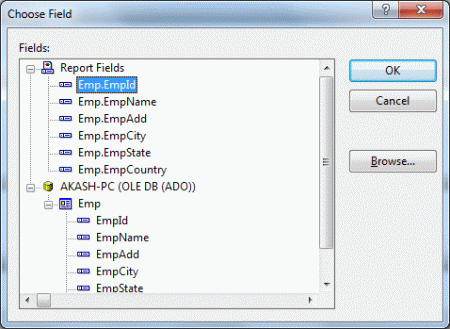
- Click on ok.
- Select is equal to and {?empid} from the dropdowns and click on OK.
- Now the designing part of the crystal report is done. Now we'll move to the coding part of the WebPage.
- Create a table Control with a drop downlist and also add a crytalreportviewer control from the Reporting Section.
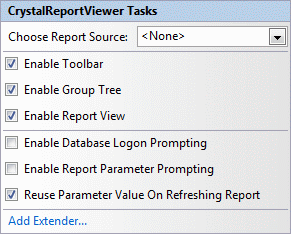
- Uncheck the checkboxes of the crystalreportviewer by clicking the smart tag of it.
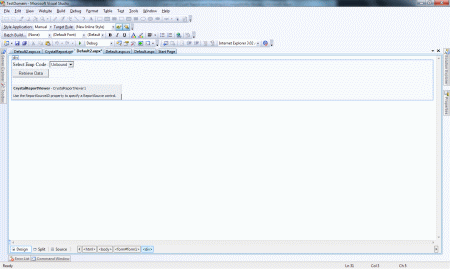
- Design you web page like the following.
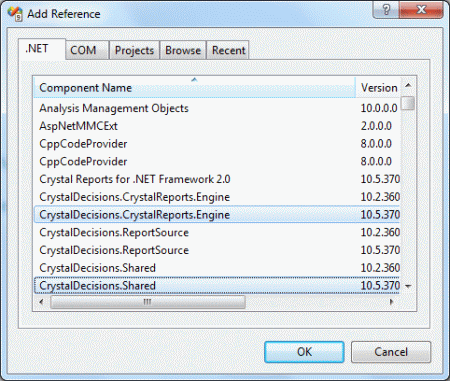
- For working with crystal report we'll have to include serveral references such as:
Following is the Source code for the same:<%@ Page Language="C#" AutoEventWireup="true" CodeFile="Default2.aspx.cs" Inherits="Default2" %> <%@ Register Assembly="CrystalDecisions.Web, Version=10.5.3700.0, Culture=neutral, PublicKeyToken=692fbea5521e1304" Namespace="CrystalDecisions.Web" TagPrefix="CR" %><!DOCTYPE html PUBLIC "-//W3C//DTD XHTML 1.0 Transitional//EN" "http://www.w3.org/TR/xhtml1/DTD/xhtml1-transitional.dtd"><html xmlns="http://www.w3.org/1999/xhtml"><head id="Head1" runat="server"> <title></title></head>
<body> <form id="form1" runat="server"> <div> <table> <tr> <td> Select Emp Code :
</td> <td> <asp:DropDownList ID="ddEmpcode" runat="server"> </asp:DropDownList> </td> </tr> <tr> <td colspan="2"> <asp:Button ID="btnSubmit" runat="server" Text="Retrieve Data" OnClick="btnSubmit_Click" /> </td> </tr>
</table> <br /> <CR:CrystalReportViewer ID="CrystalReportViewer1" runat="server" AutoDataBind="true" EnableDatabaseLogonPrompt="False" EnableParameterPrompt="False"ReuseParameterValuesOnRefresh="True" /> </div> </form></body>
</html>
Following is the Code Behind for the Sameusing System;using System.Collections.Generic;using System.Linq;using System.Web;using System.Web.UI;using System.Web.UI.WebControls;using CrystalDecisions.CrystalReports.Engine;using CrystalDecisions.Shared;using System.Data.SqlClient;using System.Data;using System.Configuration;using System.Net;using System.Net.Mail; public partial class Default2 : System.Web.UI.Page{ #region variable Declaration string dbcon = ConfigurationManager.ConnectionStrings["AdvWorks"].ConnectionString;
SqlConnection con;
SqlCommand cmd;
SqlDataAdapter da;
DataSet ds;
string pdfFile = "D:\\Testcrystal.pdf"; #endregion protected void Page_Load(object sender, EventArgs e)
{
if (!IsPostBack)
{
FillDropDown();
}
}
public void FillDropDown()
{
con = new SqlConnection(dbcon);
da = new SqlDataAdapter("select * from Emp", con);
ds = new DataSet();
da.Fill(ds);
for (int i = 0; i < ds.Tables[0].Rows.Count; i++)
{
ddEmpcode.Items.Add(ds.Tables[0].Rows[i][0].ToString());
}
}
protected void btnSubmit_Click(object sender, EventArgs e)
{
ReportDocument crystalReport = new ReportDocument();
try {
crystalReport.Load(Server.MapPath("~/CrystalReport.rpt"));
crystalReport.SetDatabaseLogon("username of Sql", "password of sql", "server name","Database name");
crystalReport.SetParameterValue("empid", ddEmpcode.Text);
CrystalReportViewer1.ReportSource = crystalReport;
crystalReport.ExportToDisk(ExportFormatType.PortableDocFormat, pdfFile);
sendMail();
}
catch (Exception e1)
{
string script = "<script>alert('"+e1.Message+"')</script>";
ClientScript.RegisterStartupScript(this.GetType(), "mailSent", script);
}
}
private void sendMail()
{
MailMessage msg = new MailMessage();
try {
msg.From = new MailAddress("email id from which the mail has to sent");
msg.To.Add("email id which will receive the mail");
msg.Body = "Employee Record";
msg.Attachments.Add(new Attachment(pdfFile));
msg.IsBodyHtml = true;
msg.Subject = "Emp Data Report uptil " +DateTime.Now.ToString() + " date";
SmtpClient smt = new SmtpClient("smtp.gmail.com");
smt.Port = 587;
smt.Credentials = new NetworkCredential("gmail email id", "gmail password");
smt.EnableSsl = true;
smt.Send(msg);
string script = "<script>alert('Mail Sent Successfully')</script>";
ClientScript.RegisterStartupScript(this.GetType(), "mailSent", script);
}
catch (Exception ex)
{
}
finally {
/* so that the error "The process cannot access the file because it is being used by another process" should not occur when we immediately
try to send another mail after one has been sent.
w3wp.exe:5800 CREATE D:\\Testcrystal.pdf
w3wp.exe:5800 WRITE D:\\Testcrystal.pdf
w3wp.exe:5800 CLOSE D:\\Testcrystal.pdf
w3wp.exe:5800 OPEN D:\\Testcrystal.pdf
w3wp.exe:5800 READ D:\\Testcrystal.pdf
As you can see, it created the PDF, it wrote the PDF, it closed the PDF (expected).
Then, there was an unexpected Open, Read, without close immediately after the file was created. So that's why we've to close the file after
sending
* it through mail because msg will open and read the file but the file is not close automattically after sending it. There will no error while sending
the first
* mail but when you try to send the next mail one after the other the above error will rise. to avoid this error we are using the Dispose methods
to release
* all the resources which are being used.
*/ msg.Dispose();
}
}
}
No comments:
Post a Comment