
Editor Control in AJAX Using ASP.NET
Introduction
Ajax (Asynchronous JavaScript and XML) is a new web development technique for interactive websites. With AJAX help we can develop a web application and retrieve small amounts of data from the web server. AJAX consists of a different type of technology.
Ajax (Asynchronous JavaScript and XML) is a new web development technique for interactive websites. With AJAX help we can develop a web application and retrieve small amounts of data from the web server. AJAX consists of a different type of technology.
- JavaScript
- XML
- Asynchronous Call to the server
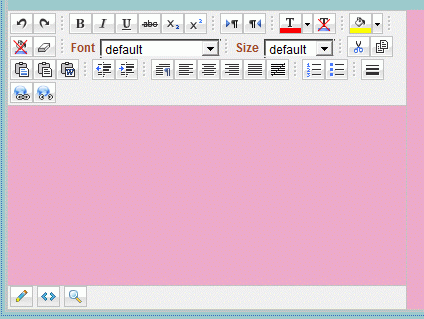
Editor Control
The Editor includes options for changing font size, selecting a font, changing background color, modifying the foreground color, adding links, adding images, changing text alignment, and performing cut, copy, and paste operations.
Step 1 : Open Visual Studio 2010.
- Go to File->New->WebSite
- Select ASP.NET Empty WebSite
Step 2 : Go to Solution Explorer and right-click.
- Select Add->New Item
- Select WebForm
- Default.aspx page open
Step 3 : Go to the Default.aspx page and click on the [Design] option and drag a control from the Toolbox.
- Drag ScriptManager, UpdatePanel, ImageButton, Label, Panel
Step 4 : Go to the Toolbox option and drag an Editor control.
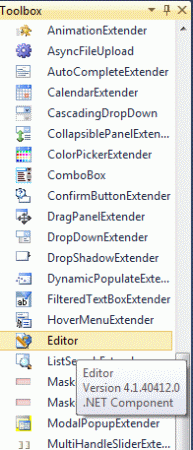
Step 5 : Go to the Default.aspx[Design] option, then look at the control.
ContentTemplate
Step 6 : We can be use an UpdatePanel for the Editor control. Inside the UpdatePanel define <ContentTemplate>.
Code
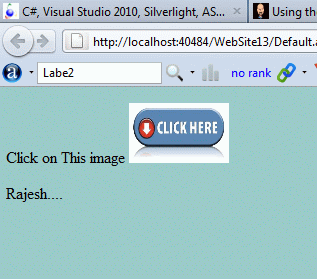
<asp:UpdatePanel ID="UpdatePanel1" runat="server"><ContentTemplate> <asp:MultiView ID="MultiView1" runat="server" ActiveViewIndex="0"> <asp:View ID="View1" runat="server"> <asp:Panel ID="Panel1" runat="server"> <p style="text-align: left"> <h> Click on This image</h> <asp:ImageButton ID="ImageButton1" ImageUrl="~/MY IMAGE.jpg" Width="100px"
Height ="60px" ToolTip="enter the value" runat="server"
onclick="ImageButton1_Click" /> </p> <asp:Label ID="Label2" runat="server" Text="Labe2" Width="25px"></asp:Label> </asp:Panel> </asp:View>
</ContentTemplate> </asp:UpdatePanel>
Height ="60px" ToolTip="enter the value" runat="server"
onclick="ImageButton1_Click" /> </p> <asp:Label ID="Label2" runat="server" Text="Labe2" Width="25px"></asp:Label> </asp:Panel> </asp:View>
</ContentTemplate> </asp:UpdatePanel>
Step 7: Ajax style behavior is accomplished by a combination of ASP.NET's MultiView control and the ASP.NET Ajax's UpdatePanel. Go to the Toolbox option and drag a Multiview control.
Code
<asp:MultiView ID="MultiView1" runat="server" ActiveViewIndex="0"> <asp:View ID="View1" runat="server"/> <asp:Panel ID="Panel1" runat="server"> <p style="text-align: left"> <h> Click on This image</h> <asp:ImageButton ID="ImageButton1" ImageUrl="~/MY IMAGE.jpg" Width="100px"
Height ="60px" ToolTip="enter the value" runat="server"
onclick="ImageButton1_Click" /> </p> <asp:Label ID="Label2" runat="server" Text="Labe2" Width="25px"></asp:Label> </asp:Panel> </asp:MultiView>
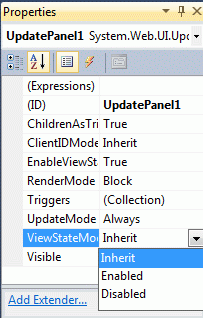
Step 8 : Go to the Default.aspx[Source] option and define and click on UpdatePanel.
- Go to property option and define ViewStateMode.
Step 9 : Go to Default.aspx.cs file and write some code as follows:
Code :
using System;using System.Collections.Generic;using System.Linq;using System.Web;using System.Web.UI;using System.Web.UI.WebControls;public partial class _Default : System.Web.UI.Page{
private int _ContentHeight;
public int ContentHeight
{
get {
return _ContentHeight;
}
set {
_ContentHeight = value;
}
}
private int _ContentWidth;
public int ContentWidth
{
get {
return _ContentWidth;
}
set {
_ContentWidth = value;
Panel1.Width = _ContentWidth;
ContentEditPanel.Width = _ContentWidth;
}
}
protected void Page_Load(object sender, EventArgs e)
{
}
protected void ImageButton1_Click(object sender, ImageClickEventArgs e)
{
Editor1.Content = Label2.Text;
MultiView1.SetActiveView(EditView);
}
protected void Save_ImageButton_Click(object sender, ImageClickEventArgs e)
{
Label2.Text = Editor1.Content;
MultiView1.SetActiveView(View1);
}
protected void Abort_ImageButton_Click(object sender, ImageClickEventArgs e)
{
MultiView1.SetActiveView(View1);
}
}
Step 10 : Go to the Default.aspx[Source] option and write some code as follows:
Code :
<title></title>
</head>
<body bgcolor="#9acbc9"> <form id="form1" runat="server"> <asp:ScriptManager ID="ScriptManager1" runat="server"> </asp:ScriptManager>
<div> <asp:UpdatePanel ID="UpdatePanel1" runat="server"> <ContentTemplate> <asp:MultiView ID="MultiView1" runat="server" ActiveViewIndex="0"> <asp:View ID="View1" runat="server"> <asp:Panel ID="Panel1" runat="server"> <p style="text-align: left"> <h> Click on This image</h> <asp:ImageButton ID="ImageButton1" ImageUrl="~/MY IMAGE.jpg" Width="100px"
Height ="60px" ToolTip="enter the value" runat="server"
onclick="ImageButton1_Click" /> </p> <asp:Label ID="Label2" runat="server" Text="Labe2" Width="25px"></asp:Label> </asp:Panel> </asp:View> <asp:View ID="EditView" runat="server"> <asp:Panel ID="ContentEditPanel" runat="server"> <p style="text-align: left"> <h>save the editor value click here</h><asp:ImageButton ID="Save_ImageButton"runat="server" Height="60px"
ImageUrl="~/MYIM1.jpg" Width="100px"
ToolTip="SAVE and Exit Edit Mode." onclick="Save_ImageButton_Click" /> <br /> <br /> <asp:ImageButton ID="Abort_ImageButton" runat="server" Height="70px"
ImageUrl="~/exit.jpg" Width="100px"
ToolTip="Click to Exit Edit Mode Without Saving."
onclick="Abort_ImageButton_Click" /> </p> <p style="text-align: left"> </p> <cc1:Editor ID="Editor1" runat="server" BackColor="#EEAACA"
BorderColor="#FFFF99" ForeColor="#9E4A2E" Height="300px" Width="400px" /> </asp:Panel> </asp:View> </asp:MultiView> </ContentTemplate> </asp:UpdatePanel> </div> </form></body>
</html>
Step 11 : Now run the application by Pressing F5.
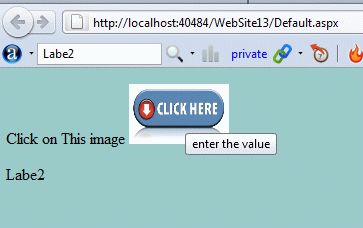
Step 12 : Now click on the image; an editor window open.
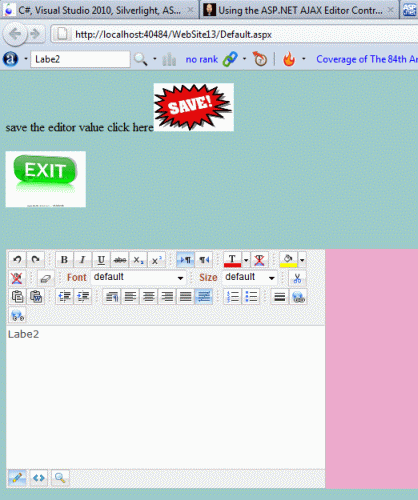
Step 13 : Now we write any text inside the editor and click on the save image button. Then the written text of the editor will be saved.
Step 14 : Now we write any text inside the editor.
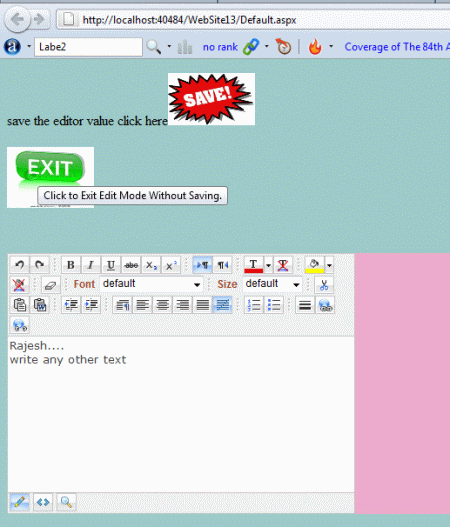
Step 15 : Click on exit image button; note that it will exit from editor without saving anything (text).
Resource
No comments:
Post a Comment