
How to create sub reports in crystal report?
Learn how to create sub reports in crystal report?
Description
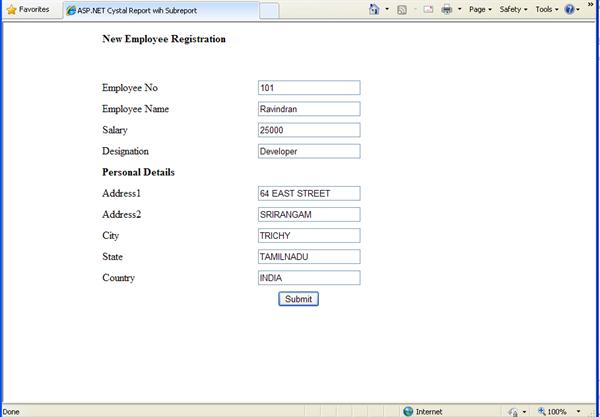
For an example I have collect employee details and store in the two different table. First table I store employee professional details and the other table I store the employee personal details. When customer take a print of particular employee detail that time we need to show both details (Professional and personal).
In that situation Sub reports is one of the option to bind data in separate report sheet show it to customer.
Table structure
create table emp (eno int,empname varchar(50),sal decimal(15,2),desig varchar(40))

create table empdet (eno int,add1 varchar(40),add2 varchar(40),city varchar(40),state varchar(40),country varchar(40))
Default page : Client side
In this page I am collection information about the employee like professional and personal details and store it in two different table.
<%@ Page Language="C#" AutoEventWireup="true" CodeFile="Default.aspx.cs" Inherits="_Default" %>

<!DOCTYPE html PUBLIC "-//W3C//DTD XHTML 1.0 Transitional//EN" "http://www.w3.org/TR/xhtml1/DTD/xhtml1-transitional.dtd">
<html xmlns="http://www.w3.org/1999/xhtml">
<head runat="server">
    <title>ASP.NET Cystal Report wih Subreport</title>
</head>
<body>
    <form id="form1" runat="server">
    <div>
        <table cellpadding="0" cellpadding="0" align="center" width="600">
            <tr>
                <td height="30" colspan="2">
                    <b>New Employee Registration</b>
                </td>
            </tr>
            <tr>
                <td height="40" colspan="2" align="center">
                    <asp:Label ID="Label1" runat="server"></asp:Label>
                </td>
            </tr>
            <tr>
                <td height="30">
                    Employee No
                </td>
                <td>
                    <asp:TextBox ID="txteno" runat="server"></asp:TextBox>
                </td>
            </tr>
             <tr>
                <td height="30">
                    Employee Name
                </td>
                <td>
                    <asp:TextBox ID="txtempname" runat="server"></asp:TextBox>
                </td>
            </tr>
             <tr>
                <td height="30">
                   Salary
                </td>
                <td>
                    <asp:TextBox ID="txtsal" runat="server"></asp:TextBox>
                </td>
            </tr>
             <tr>
                <td height="30">
                    Designation
                </td>
                <td>
                    <asp:TextBox ID="txtdesign" runat="server"></asp:TextBox>
                </td>
            </tr>
             <tr>
                <td height="30" colspan="2" align="left">
                    <b>Personal Details</b>
                </td>
            </tr>
            <tr>
                <td height="30">
                    Address1
                </td>
                <td>
                    <asp:TextBox ID="txtAdd1" runat="server"></asp:TextBox>
                </td>
            </tr>
             <tr>
                <td height="30">
                    Address2
                </td>
                <td>
                    <asp:TextBox ID="txtAdd2" runat="server"></asp:TextBox>
                </td>
            </tr>
             <tr>
                <td height="30">
                   City
                </td>
                <td>
                    <asp:TextBox ID="txtcity" runat="server"></asp:TextBox>
                </td>
            </tr>
             <tr>
                <td height="30">
                   State
                </td>
                <td>
                    <asp:TextBox ID="txtstate" runat="server"></asp:TextBox>
                </td>
            </tr>
             <tr>
                <td height="30">
                   Country
                </td>
                <td>
                    <asp:TextBox ID="txtCountry" runat="server"></asp:TextBox>
                </td>
            </tr>
             <tr>
                <td height="30" colspan="2" align="center">
                    <asp:Button ID="btnSubmit" runat="server" Text="Submit"
                        onclick="btnSubmit_Click" />
                </td>
            </tr>
        </table>
    </div>
    </form>
</body>
</html>
Design side look like this
Default page : Server side
Insert data into the two different table using below code
using System.Data;
using System.Data.SqlClient;
using System.Configuration;

public partial class _Default : System.Web.UI.Page
{
    SqlConnection sqlcon = new SqlConnection(ConfigurationManager.ConnectionStrings["Con"].ToString());
    SqlCommand sqlcmd = new SqlCommand();

    protected void Page_Load(object sender, EventArgs e)
    {

    }
    protected void btnSubmit_Click(object sender, EventArgs e)
    {
        try
        {
            sqlcon.Open();
            sqlcmd = new SqlCommand("insert into emp(eno,empname,sal,desig) values('" + txteno.Text + "','" + txtempname.Text + "','" + txtsal.Text + "','" + txtdesign.Text + "')", sqlcon);
            sqlcmd.ExecuteNonQuery();

            sqlcmd = new SqlCommand("insert into empdet(eno,add1,add2,city,state,country) values('" + txteno.Text + "','" + txtAdd1.Text + "','" + txtAdd2.Text + "','" + txtcity.Text + "','" + txtstate.Text + "','" + txtCountry.Text + "')", sqlcon);
            sqlcmd.ExecuteNonQuery();

            Label1.Text = "Record insert successfully";
            clear();
        }
        catch (Exception ex)
        {

        }
        finally
        {
            sqlcon.Close();
        }
    }

    void clear()
    {
        foreach (Control c in form1.Controls)       //This loop takes all controls from the form1
        {
            //Clear all textbox values
            if (c is TextBox)
                ((TextBox)c).Text = "";

            //clear all check boxes
            if (c is CheckBox)
                ((CheckBox)c).Checked = false;

            //Clear all radio buttons
            if (c is RadioButton)
                ((RadioButton)c).Checked = false;
        }
    }
}
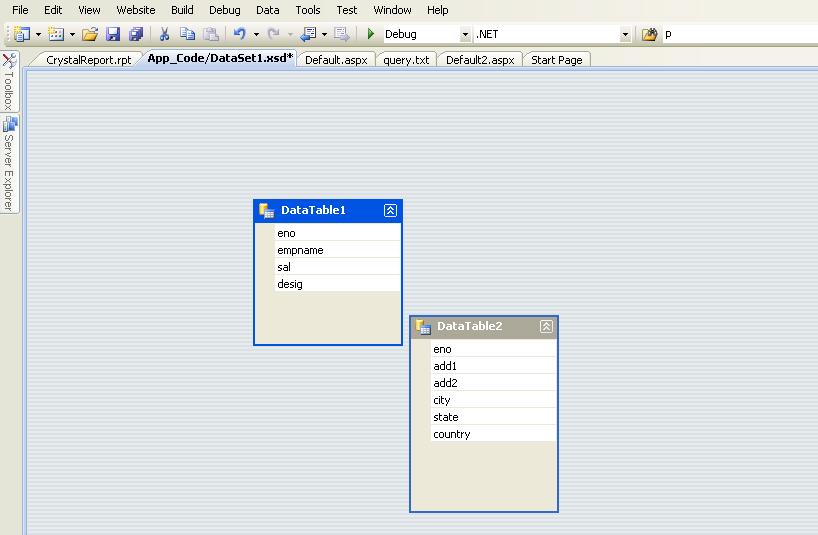
Create Dataset with fields
Now right click on the project name add DataSet1.xsd into the App_Code folder and right click on the designer to add new datatable with the table fields like below
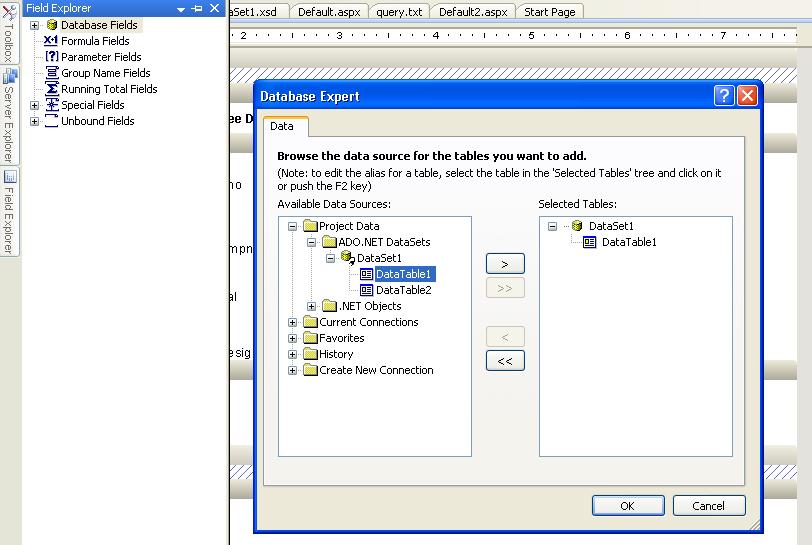
Create Crystal Report
Now right click on the Project name again and add new crystal report in the project name it as CrystalReport.rpt
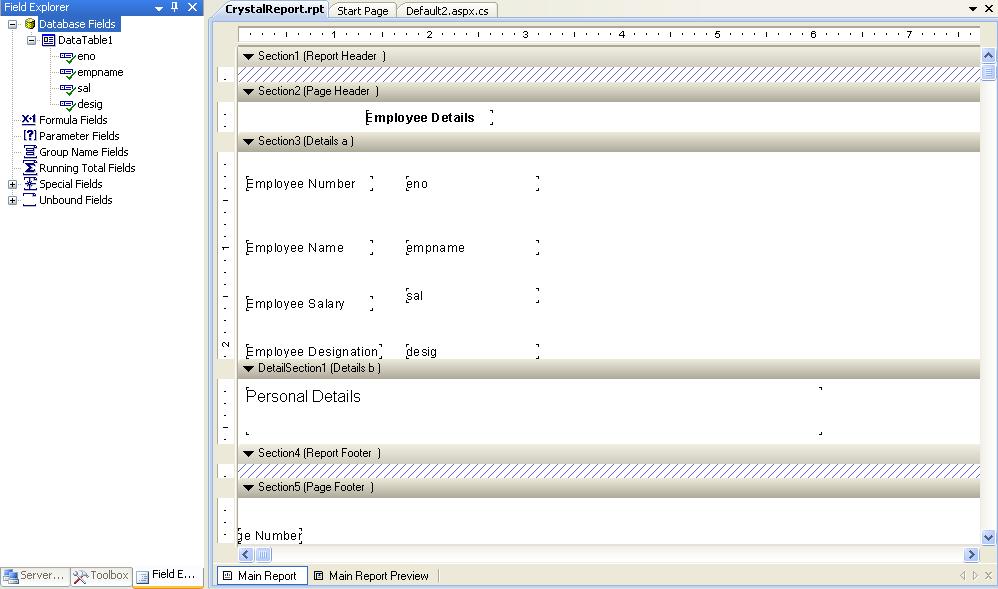
Then right click on the Field Explorer and choose database expert choose newly created DataSet1 -> DataTable1 and click ok button to add that DataSet1 Fields in the crystal report designer.
Design Crystal report
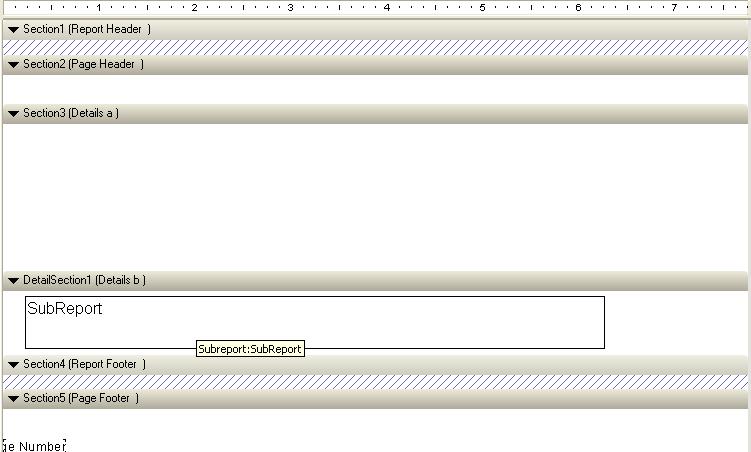
Design your crystal report with the Field explorer fields and follow below steps to create sub report
1) Right click on your section choose Insert section below
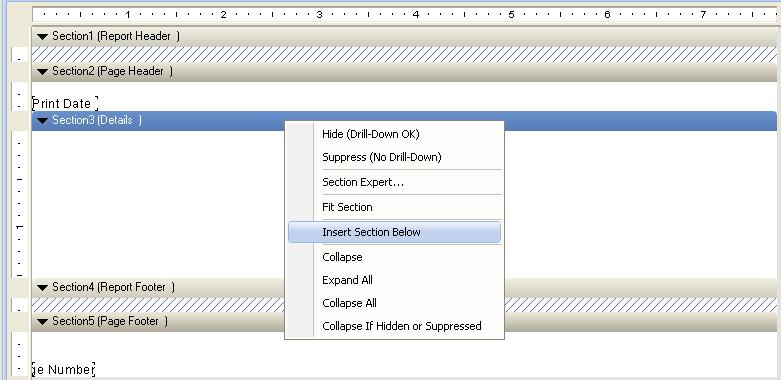
2) Right click on details section choose -- > Insert sub report
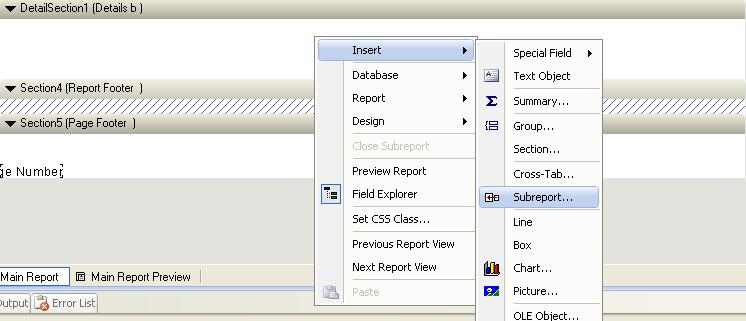
3) If you design already design sub report then choose a crystal report in a project otherwise choose Create a sub report with report wizard
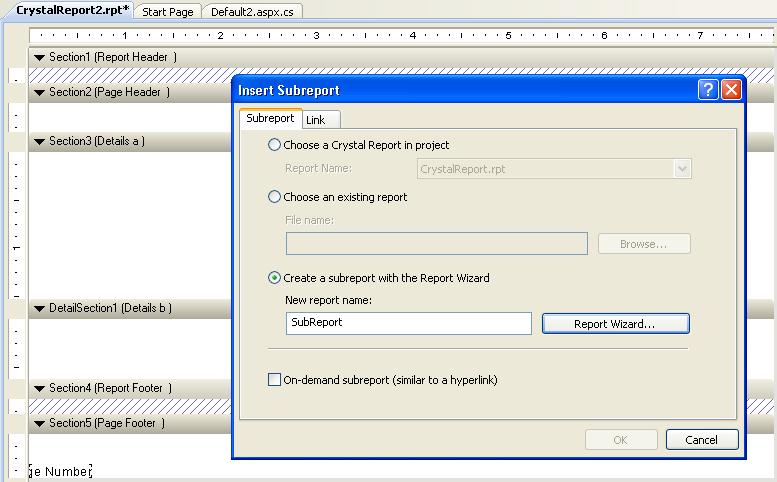
4) Now double click on the sub report to open sub report
5) Design sub report using field explorer and after that right click and close sub report

6) Desgin your primary report to using datatable1
That's all now create one page to display crystal report in web page
Default2 Page: Client side
<%@ Page Language="C#" AutoEventWireup="true" CodeFile="Default2.aspx.cs" Inherits="Default2" %>

<%@ Register Assembly="CrystalDecisions.Web, Version=10.5.3700.0, Culture=neutral, PublicKeyToken=692fbea5521e1304"
    Namespace="CrystalDecisions.Web" TagPrefix="CR" %>
<!DOCTYPE html PUBLIC "-//W3C//DTD XHTML 1.0 Transitional//EN" "http://www.w3.org/TR/xhtml1/DTD/xhtml1-transitional.dtd">
<html xmlns="http://www.w3.org/1999/xhtml">
<head runat="server">
    <title>Crystal Report Grouping</title>
</head>
<body>
    <form id="form1" runat="server">
    <div>
        Enter Employee Number to display details<asp:TextBox ID="txeno" runat="server"></asp:TextBox>
        <br /><br />
        <asp:Button ID="btnSubmit" runat="server" Text="Submit"
            onclick="btnSubmit_Click" /><br /><br />
        <div style="text-align:center">
            <CR:CrystalReportViewer ID="CrystalReportViewer1" runat="server" AutoDataBind="true" />
        </div>
    </div>
    </form>
</body>
</html>
Default2 Page Server side
using System.Data;
using System.Data.SqlClient;
using System.Configuration;
using CrystalDecisions.CrystalReports.Engine;
using CrystalDecisions.Shared;
using CrystalDecisions.Web;
using CrystalDecisions.ReportSource;

public partial class Default2 : System.Web.UI.Page
{
    SqlConnection sqlcon = new SqlConnection(ConfigurationManager.ConnectionStrings["Con"].ToString());
    SqlCommand sqlcmd = new SqlCommand();
    SqlDataAdapter da = new SqlDataAdapter();
    DataTable dt = new DataTable();
    DataTable dt1 = new DataTable();

    protected void Page_Load(object sender, EventArgs e)
    {
        btnSubmit_Click(this,new EventArgs());
    }

    protected void btnSubmit_Click(object sender, EventArgs e)
    {
        string query;
        try
        {
            sqlcon.Open();
            query = "select * from emp where eno='" + txeno.Text + "'";
            sqlcmd = new SqlCommand(query, sqlcon);
            da = new SqlDataAdapter(sqlcmd);
            dt.Clear();
            da.Fill(dt);
            if (dt.Rows.Count > 0)
            {
                //Assign data to the primary report
                ReportDocument RptDoc = new ReportDocument();
                RptDoc.Load(Server.MapPath("~/CrystalReport.rpt"));
                RptDoc.SetDataSource(dt);

                query = "select * from empdet where eno='" + txeno.Text + "'";
                sqlcmd = new SqlCommand(query, sqlcon);
                da = new SqlDataAdapter(sqlcmd);
                dt1.Clear();
                da.Fill(dt1);

                //Get sub report and assign datatable1 to that report
                foreach (ReportObject repOp in RptDoc.ReportDefinition.ReportObjects)
                {
                    if (repOp.Kind == ReportObjectKind.SubreportObject)
                    {
                        string SubRepName = ((SubreportObject)repOp).SubreportName;
                        ReportDocument subRepDoc = RptDoc.Subreports[SubRepName];
                        subRepDoc.SetDataSource(dt1);
                    }
                }
                //Assign report to the crystal report viewer
                CrystalReportViewer1.ReportSource = RptDoc;
                CrystalReportViewer1.DataBind();
            }
        }
        catch (Exception ex)
        {
            Response.Write(ex.ToString());
        }
        finally
        {
            sqlcon.Close();
        }

    }
}
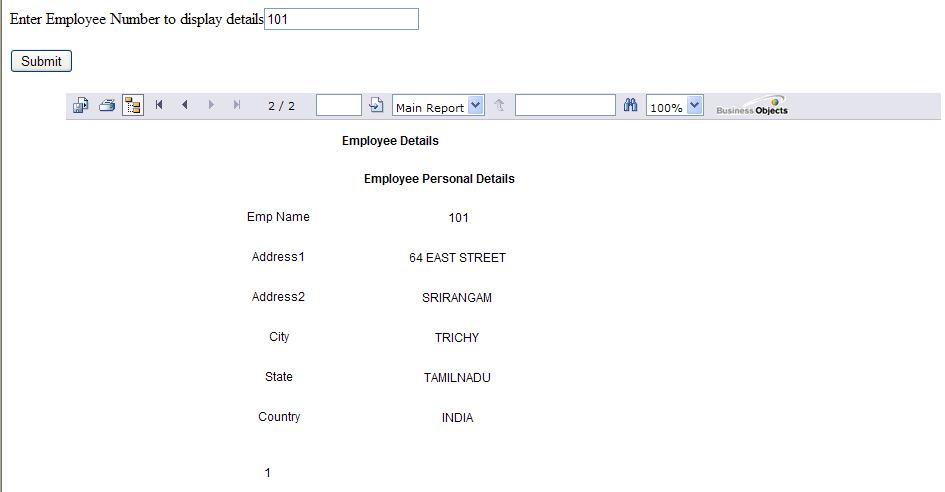
Output
The output of the above code snippet is look like this
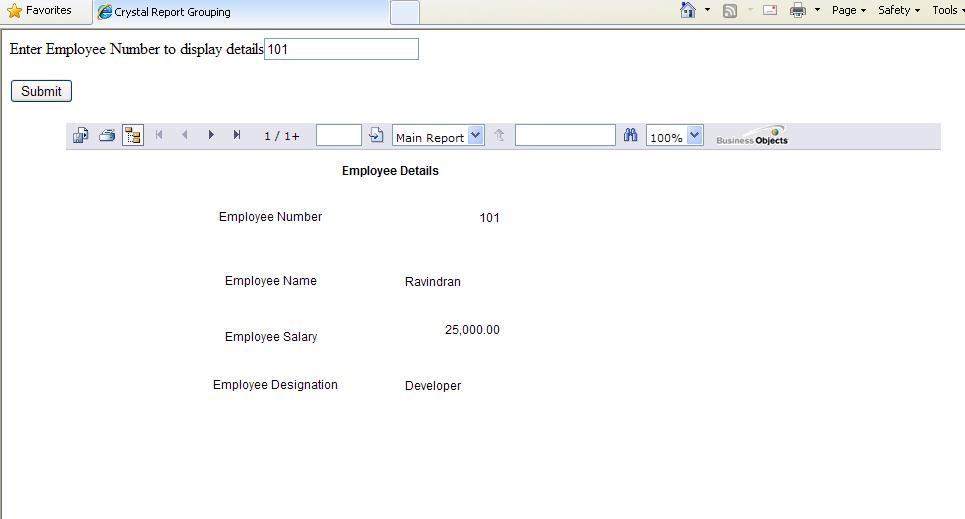
Sub report display in next page.
Source Code Detail:
Here with I have attached source code Crystal report with sub report example download it and try it.
Front End : ASP.NET
Code behind : C#
No comments:
Post a Comment