
Working Picasa Style Photo Album Using ListView Control in ASP.Net
Figure 1 - Albums

Figure 2 – Photos in Thumbnail View
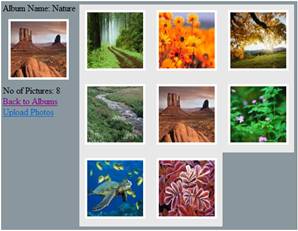
Figure 3 – Full photo view

Moving forward, we will implement a photo album that works similar to Picasa using ListView control. As I said earlier, Picasa offers lot many features but we will implement only the above said ones to understand the flexibilities offered by ListView control in ASP.Net 3.5.
Understanding DataBase Design
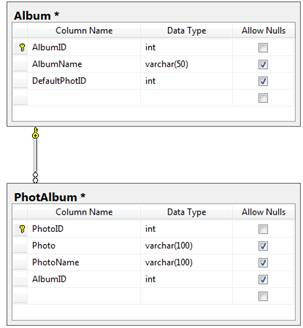
Before moving to the actual implementation, we will first see the database design which stores the album information to understand the implementation better. Refer the below database diagram,
The database contains 2 tables,
1. Album – Stores information’s about album. DefaultPhotID column stores ID of the photo that is set as album cover.
2. PhotAlbum – It contains all the information about albums. The column Photo will store location of the photo where it is uploaded.
You can increase the column size as per your need.
In coming sections, we will see how we can implement this with ListView control.
Creating Albums List
In Album List Page, we will display 3 albums in a row in Tiled format i.e. to repeat the display of items horizontally, Refer Figure 1. To create a new Album, a “Create New Album” link will be displayed at the end of the ListView control. This link will be automatically moved to the last column of the ListView control whenever a new Album is added. We will see how this can be implemented with ListView control.
To display data in ListView control, we have to first define the mandatory templates, Layout Template and Item Template. Read my previous article - ListView Control in ASP.Net 3.5 to gain more knowledge on this.
Additionally, we will use Group Template to group the data in tiled format. We can restrict the number of items in a row by using a property called GroupItemCount.
To display “Create New Album” link, we can use another ListView template called InsertItemTemplate. The content in InsertItemTemplate will be displayed to insert a new item in the ListView. We can set the property called InsertItemPosition to dictate where we can display the InsertItemTemplate. In our case, it is LastItem.
So, our final ListView control code will look like,
<asp:ListView ID="lvAlbums" runat="server"
DataSourceID="SqlDataSource1" GroupItemCount="3"
InsertItemPosition="LastItem">
<LayoutTemplate>
<table border="1">
<tr ID="groupPlaceholder" runat="server">
</tr>
</table>
</LayoutTemplate>
<GroupTemplate>
<tr>
<td ID="itemPlaceholder" runat="server">
</td>
</tr>
</GroupTemplate>
<ItemTemplate>
<td id="Td3" width="150px" height="150px" align="center" style="background-color: #e8e8e8;color: #333333;">
<asp:HiddenField ID="hfPhotoID" runat="server" Value='<%# Eval("DefaultPhotID") %>' />
<a href='<%# "Photos.aspx?AlbumID="+Eval("AlbumID") %>'>
<asp:Image CssClass="Timg" runat="server" ID="imPhoto" ImageUrl='<%# "ThumbNail.ashx?ImURL="+Eval("Photo") %>' />
</a>
<br />
<b><asp:Label ID="lblAlbumName" runat="server" Text='<%# Eval("AlbumName") %>'></asp:Label> </b>
</td>
</ItemTemplate>
<InsertItemTemplate>
<td id="Td3" width="150px" height="150px" runat="server" align="center" style="background-color: #e8e8e8;color: #333333;">
<a href="CreateAlbum.aspx">
Create New Album
</a>
</td>
</InsertItemTemplate>
</asp:ListView>
<asp:SqlDataSource ID="SqlDataSource1" runat="server"
ConnectionString="<%$ ConnectionStrings:ConnectionString %>"
SelectCommand="SELECT Album.AlbumID, Album.DefaultPhotID, Album.AlbumName, PhotAlbum.Photo FROM Album INNER JOIN PhotAlbum ON Album.DefaultPhotID = PhotAlbum.PhotoID">
</asp:SqlDataSource>
In the above code, I have used GroupItemCount as 3. Increase this value to display more number of Albums in a row. I have used SqlDataSource control to bind the data from database.
Since, the album cover should be the one of the photo(DefaultPhotID column of Album table) uploaded in the album, we should display its thumbnail version as its album cover. To do this, we will use an HttpHandler[ThumbNail.ashx] which will convert the full image to Thumbnail image.
Below, you can find the HttpHanlder implementation that generates the thumbnail image(100x100) from the original image.
<%@ WebHandler Language="C#" Class="ThumbNail" %>
using System;
using System.Web;
using System.Drawing;
using System.IO;
public class ThumbNail : IHttpHandler {
public void ProcessRequest (HttpContext context) {
string imageurl = context.Request.QueryString["ImURL"];
string str = context.Server.MapPath(".") + imageurl;
Bitmap bmp = new Bitmap(str);
System.Drawing.Image img = bmp.GetThumbnailImage(100, 100, null, IntPtr.Zero);
MemoryStream ms = new MemoryStream();
img.Save(ms, System.Drawing.Imaging.ImageFormat.Jpeg);
byte[] bmpBytes = ms.GetBuffer();
img.Dispose();
ms.Close();
context.Response.BinaryWrite(bmpBytes);
context.Response.End();
}
public bool IsReusable {
get {
return false;
}
}
}
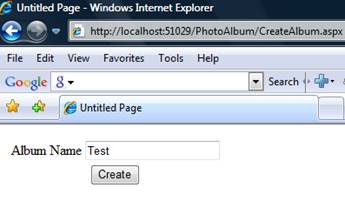
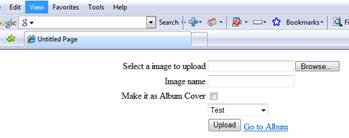
Next, clicking “Create New Album” link will take us to CreateAlbum.aspx page to create new album. Once the album is created, this will further take to photo uploading page (ImageUpload.aspx) to upload images for an album. Refer the below figures,
CreateAlbum.aspx
ImageUpload.aspx
I am not going to discuss about the implementation of these pages as this is not in the scope of the article. You can download the source attached with this article to see it in action.
At last, when a user clicks an Album, he or she will be re-directed to page (photos.aspx) where we should display the list of photos that is uploaded under the album in thumbnail view.
|
| |||||||||
Displaying photos in Thumbnail View
In photos.aspx page, we will accept the AlbumId through the QueryString parameter and populate the ListView control. Again, we will use GroupTemplate to display 3 photos per row. Refer the Figure 2. In Figure 2, the list of thumbnail photos(content in right) are rendered by the ListView control while content on the left side which displays Album information is handled separately.
To display the thumbnail view of every photo, we will use the same HttpHandler [ThumbNail.ashx] used in Albums page. You can consider saving a thumbnail version of every photo while uploading to improve performance. In this approach, every time when the user views the album it will generate the equivalent thumbnail image which we can really prevent if we do the thumbnail conversion when the user uploading the actual image. Refer the below link to do this,
Finally, ListView control will look like,
<asp:ListView ID="lvPhotos" runat="server" DataKeyNames="AlbumID"
DataSourceID="SqlDataSource1" GroupItemCount="3">
<LayoutTemplate>
<table ID="groupPlaceholderContainer" runat="server" border="0" cellpadding="0" cellspacing="0">
<tr ID="groupPlaceholder" runat="server">
</tr>
</table>
</LayoutTemplate>
<GroupTemplate>
<tr ID="itemPlaceholderContainer" runat="server">
<td ID="itemPlaceholder" runat="server">
</td>
</tr>
</GroupTemplate>
<ItemTemplate>
<td runat="server" align="center" style="background-color: #e8e8e8;color: #333333;">
<a href='<%# "PhotoViewer.aspx?PhotoID="+Eval("PhotoID")+"&AlbumID="+ Eval("AlbumID") %>'>
<asp:Image CssClass="Timg" runat="server" ID="imPhoto" ImageUrl='<%# "ThumbNail.ashx?ImURL="+Eval("Photo") %>' />
</a>
</td>
</ItemTemplate>
</asp:ListView>
<asp:SqlDataSource ID="SqlDataSource1" runat="server"
ConnectionString="<%$ ConnectionStrings:ConnectionString %>"
SelectCommand="SELECT [PhotoID], [Photo], [PhotoName], [AlbumID] FROM [PhotAlbum] WHERE ([AlbumID] = @AlbumID) ORDER By [PhotoID] ASC"
onselected="SqlDataSource1_Selected">
<SelectParameters>
<asp:QueryStringParameter DefaultValue="1" Name="AlbumID"
QueryStringField="AlbumID" Type="Int32" />
</SelectParameters>
</asp:SqlDataSource>
Again, I have used SqlDataSource control to bind the data from database.
To view the full image, users have to click any of the thumbnail images which will load the full image with next and previous button. Next section will help you to do this.
Viewing Full Image
Once the user clicks any of thumbnail images we will load the full image in a ListView control(Refer PhotoViewer.aspx in our sample) by accepting AlbumId and PhotoID as query string parameter. Refer Figure 3 for better understanding. We will also display next and previous button to navigate between the photos in that album. Unlike the other 2 pages, we will bind the data using our code.
In this scenario, we will display one image at a time in ListView control as seen the Figure 3. We will again use GroupTemplate to display the images in ListView.
Note
We can also do this without using GroupTemplate. Using GroupTemplate we can increase the number photos displayed at a time using GroupItemCount property.
Next and Previous button is displayed through the DataPager control. Read my article - Paging in ListView in ASP.Net 3.5 to know more about DataPager and Paging in ListView control.
So, our ListView control will look like,
<table>
<tr>
<td>
<asp:ListView ID="lvPhotoViewer" runat="server" GroupItemCount="1">
<LayoutTemplate>
<table ID="groupPlaceholderContainer" runat="server" border="1">
<tr ID="groupPlaceholder" runat="server">
</tr>
</table>
</LayoutTemplate>
<ItemTemplate>
<td id="Td4" align="center" style="background-color: #eeeeee;">
<asp:Image runat="server" ID="imPhoto" Height="450px" Width="450px" ImageUrl='<%# "~"+Eval("Photo") %>' />
<br />
<asp:Label ID="DefaultPhotIDLabel" runat="server"
Text='<%# Eval("PhotoName") %>' />
</td>
</ItemTemplate>
<GroupTemplate>
<tr ID="itemPlaceholderContainer" runat="server">
<td ID="itemPlaceholder" runat="server">
</td>
</tr>
</GroupTemplate>
</asp:ListView>
</td>
</tr>
<tr>
<td align="center">
<asp:DataPager ID="DataPager1" runat="server"
PagedControlID="lvPhotoViewer" PageSize="1"
onprerender="DataPager1_PreRender">
<Fields>
<asp:NextPreviousPagerField ButtonType="Link"
PreviousPageText="<< " NextPageText=" >>" />
</Fields>
</asp:DataPager>
</td>
</tr>
</table>
CodeBehind
protected void Page_Load(object sender, EventArgs e)
{
if (!Page.IsPostBack)
{
string photoID = Request.QueryString["PhotoID"];
string albumID = Request.QueryString["AlbumID"];
ViewState["hfAlbumID"] = albumID;
//Get Page number by passing photo id
int index = GetPageNumber(int.Parse(photoID), int.Parse(albumID));
DataPager1.SetPageProperties(index, 1, true);
}
}
/// <summary>
/// Since the pagesize is 1 the row number can be taken as page number
/// </summary>
/// <param name="PhotoID"></param>
/// <param name="AlbumID"></param>
/// <returns></returns>
public int GetPageNumber(int PhotoID,int AlbumID)
{
SqlConnection con = new SqlConnection(ConfigurationManager.ConnectionStrings["ConnectionString"].ConnectionString);
con.Open();
SqlCommand com = new SqlCommand("SELECT PageNumber FROM (SELECT row_number() Over (order by photoid asc) AS PageNumber,photoid,Albumid FROM PhotAlbum where Albumid=" + AlbumID.ToString() + ") As Photos where photoid=" + PhotoID.ToString() + " and Albumid=" + AlbumID.ToString(), con);
SqlDataReader dr = com.ExecuteReader();
int pageno = 1;
if (dr.Read())
{
pageno = int.Parse(dr["PageNumber"].ToString());
}
dr.Close();
con.Close();
return (pageno - 1);
}
public DataTable GetPhoto(string query)
{
SqlConnection con = new SqlConnection(ConfigurationManager.ConnectionStrings["ConnectionString"].ConnectionString);
SqlDataAdapter ada = new SqlDataAdapter(query, con);
DataTable dtEmp = new DataTable();
ada.Fill(dtEmp);
return dtEmp;
}
protected void DataPager1_PreRender(object sender, EventArgs e)
{
lvPhotoViewer.DataSource = GetPhoto("Select * from PhotAlbum where AlbumID = " + ViewState["hfAlbumID"].ToString());
lvPhotoViewer.DataBind();
}
Since, we are displaying one image at a time i.e. PageSize is 1, the page number and Row number got from SqlServer 2005 will be same. Hence, GetPageNumber() method will return the Row_Number() of the Thumbnail photo that is clicked to reach this page and it can be used to bind the particular page in ListView control.
Note
Row_Number() will work in Sql Server 2005 and above only. I have used inline query to bind the data from database. You can consider using stored procedures for better performance and also it prevents SQL injection attack.
|
No comments:
Post a Comment